Navigation
Install the app
How to install the app on iOS
Follow along with the video below to see how to install our site as a web app on your home screen.
Note: This feature may not be available in some browsers.
More options
Style variation
You are using an out of date browser. It may not display this or other websites correctly.
You should upgrade or use an alternative browser.
You should upgrade or use an alternative browser.
DIY: Floating Console Modification
- Thread starter kitkat
- Start date
I don't have one on hand. but I can tell you, in general it's not very perceivably bright. Maybe it's 'better' on the passenger side for us US folks but my recollection is it is a very soft blue-ish light. It's very subtle and I have to be reminded it's there.
I wanted a bit more light over the mod too. I added a small light that plugged into the USB port right above the tray.Can someone post another side profile picture of this lit up at night? We kind of have one, but I have a feeling it's brighter than we've seen so far (on this thread).
Comes with a bunch of different colors. put one in my center console too.
.
I don't have a link, but you can email Dino in parts at Gator Motorsports
dino@gatormotorsport.com
He will send you an invoice and get one sent out if he still has them in stock.
Dino_GatorParts
New member
- Apr 24, 2025
- 1
- 5
I am out of stock as of today, but I do have more on order... eta soonTMI don't have a link, but you can email Dino in parts at Gator Motorsports
dino@gatormotorsport.com
He will send you an invoice and get one sent out if he still has them in stock.

Mr. Sparkle
Active member
Hey Cilantro. Killer work adapting the auto tray for this mod. Quick question: the new bolts you list, are those required for install of the new tray or did you just provide that in case anyone wanted to also swap to the nicer style? Wondering if I can just use the existing hardware for initial installation and then change over to nicer bolts later.Part number is 889073113511B.
No, you have to cut an opening in the tray and the rubber liner in the shape of the black spacer the shifter sits on top of.
You also have to cut a slit at the back of the tray so the shifter “arm” fits through it.
The automatic tray uses the same 3 bolts up front and 2 more at the back. Rivnuts are already pre installed in the chassis so you’ll need 2x 20mm M6x1.0 bolts.
The bolts for the shifter base are 25mm M6x1.0
You can use all the existing hardware. No new parts (except tray)Hey Cilantro. Killer work adapting the auto tray for this mod. Quick question: the new bolts you list, are those required for install of the new tray or did you just provide that in case anyone wanted to also swap to the nicer style? Wondering if I can just use the existing hardware for initial installation and then change over to nicer bolts later.
I think you need two new bolts for the rear of the new tray that were not needed for the smaller tray that is replaced.Hey Cilantro. Killer work adapting the auto tray for this mod. Quick question: the new bolts you list, are those required for install of the new tray or did you just provide that in case anyone wanted to also swap to the nicer style? Wondering if I can just use the existing hardware for initial installation and then change over to nicer bolts later.
yellowemira
Member
I only went halfway with this mod, basically just removing the mesh cage. (Thanks to @kitkat for the disassembling instructions!) As with any car DIY I undertake, however, I've ended up with spare parts. 
Does anyone know where these bolt tubes may have come from?
Does anyone know where these bolt tubes may have come from?
Attachments

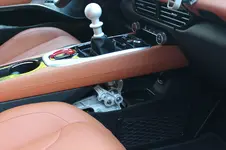
they go in between the ac controls and the dashI only went halfway with this mod, basically just removing the mesh cage. (Thanks to @kitkat for the disassembling instructions!) As with any car DIY I undertake, however, I've ended up with spare parts.
Does anyone know where these bolt tubes may have come from?
yellowemira
Member
Thank you, @mr.suntorytime! But man, I’m going to have to take off the kick panel again to get to that. Haha.they go in between the ac controls and the dash
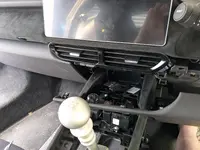
So I also did this over the weekend, and have a couple of mini-tips that might help out others:
1. You don't necessarily need to unhook all the wiring looms from the dash panel... I couldn't figure out if they were supposed to unclip easily, or just required more force than I was comfortable applying, but there is enough slack to manoeuvre the panel out of the way when removing the HVAC controls and centre console (possibly made less awkward by doing most of the centre console removal steps first).


2. You can keep the spacers that go behind the HVAC control unit where they are supposed to be with a bit of tape (and even stab the screw straight through the tape to hold those nicely in position too). Makes putting the unit back in less fiddly.

1. You don't necessarily need to unhook all the wiring looms from the dash panel... I couldn't figure out if they were supposed to unclip easily, or just required more force than I was comfortable applying, but there is enough slack to manoeuvre the panel out of the way when removing the HVAC controls and centre console (possibly made less awkward by doing most of the centre console removal steps first).
2. You can keep the spacers that go behind the HVAC control unit where they are supposed to be with a bit of tape (and even stab the screw straight through the tape to hold those nicely in position too). Makes putting the unit back in less fiddly.
Attachments
So I emailed Dino and he has them in stock again so I ordered one up. I must say he is exceptionally fast. I emailed at 7:21am my time and had a tracking number at 8:47am. This guy is great.
Shift boot deletes are back in stock.
- Thread starter
- #217
I got a black powdercoated shift boot delete from @mr.suntorytime !

Hard to photograph, but it looks way nicer than my plastic printed part.
Hard to photograph, but it looks way nicer than my plastic printed part.
Last edited:
Super stealthyI got a black powdercoated shift boot delete from @mr.suntorytime !
View attachment 64541
Hard to photograph, but it looks way nicer than my plastic printed part.
Tracking shows my tray arriving tomorrow so I'm hoping to dig into this one this weekend. I too have the suntory black option for the void look.
Emira Forum Images


Emira Forum Images
Similar threads
- Replies
- 89
- Views
- 18K
- Replies
- 6
- Views
- 1K
- Replies
- 38
- Views
- 3K

