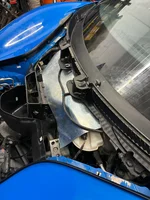
Water membrane

A membrane that outlived the car ! (seen on Ebay)

View attachment 85054
What on earth happened there, looks like he managed to hit front, back and top.
This sort of this usually gets reported on one Lotus forum or another, but I have not seen anything about this one previously
 
For the folks in Canada, I just remembered I have a 4’x4’ CNC machine in the basement. Just need to find a way to source the material at a decent price.
 
What on earth happened there, looks like he managed to hit front, back and top.
This sort of this usually gets reported on one Lotus forum or another, but I have not seen anything about this one previously
Looks like a roll-over and tumble crash or into a forest. Certain parts could have been cut-off by emergency responders and/or recovery and salvage techs.

Accidents like this are not uncommon when folks take their eyes off the road in highway cruising or fall asleep behind the wheel.
 
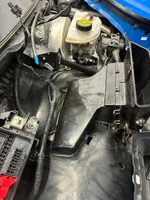
I checked my water membrane today while replacing the cabin air filter. I'm surprised to find out that mine is still in perfectly good shape. PNW weather has been kind to the rubber, I guess.

Probably don't need to worry about it in the near future but I still moved it around a bit to increase the coverage on the right-hand side.

IMG_5342.webp
IMG_5343.webp

IMG_5344.webp


IMG_5345.webp
 
The bigger question is: where did you get the cabin filter from ?
A reference would be helpful.

Thanks
Neil
 
The bigger question is: where did you get the cabin filter from ?
A reference would be helpful.

Thanks
Neil
GRP


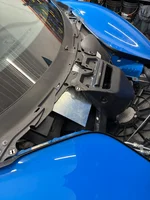
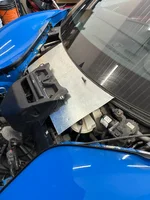
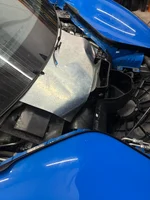
As I posted on the last page, I found out that water will get into the HVAC system through the foam beneath the filter housing. The front is fairly well protected by the housing itself, but water will absolutely pool at the back. Regardless of who's using what when it comes to materials, all the solutions so far have significant creases. With material degradation through heat cycles and the 80c ambient temperature differential all year round, I'm approaching the problem differently.

The first layer is firmly held by the two bolts holding the HVAC system to the chassis. It is also sandwiched between the base of the filter housing. The resistor pack is entirely covered by this layer. I do plan on adding a bead of silicone around the opening.

The second layer is held in place by the guiding pins of the upper section of the housing and the screws. I didn't feel like cutting a hole for the structural member, and the the underneath layer is already providing protection to the resistor pack.

I will order the plastic part, that sits on top of the windshield, along with the bracket in the center that holds the hood in place in order to fabricate layers that can be perfectly glued to the underside.

1785035899297.webp

1785035908072.webp

1785035921443.webp

1785035930664.webp

1785035993167.webp

1785035966020.webp

1785036028512.webp

1785036037372.webp

1785036076130.webp

1785036104243.webp
 
As I posted on the last page, I found out that water will get into the HVAC system through the foam beneath the filter housing. The front is fairly well protected by the housing itself, but water will absolutely pool at the back. Regardless of who's using what when it comes to materials, all the solutions so far have significant creases. With material degradation through heat cycles and the 80c ambient temperature differential all year round, I'm approaching the problem differently.

The first layer is firmly held by the two bolts holding the HVAC system to the chassis. It is also sandwiched between the base of the filter housing. The resistor pack is entirely covered by this layer. I do plan on adding a bead of silicone around the opening.

The second layer is held in place by the guiding pins of the upper section of the housing and the screws. I didn't feel like cutting a hole for the structural member, and the the underneath layer is already providing protection to the resistor pack.

I will order the plastic part, that sits on top of the windshield, along with the bracket in the center that holds the hood in place in order to fabricate layers that can be perfectly glued to the underside.

View attachment 85666
View attachment 85667
View attachment 85668
View attachment 85669
View attachment 85671
View attachment 85670
View attachment 85672
View attachment 85673
View attachment 85674
View attachment 85675
Super intrigued with this one. Looking forward to seeing how you get on 👍👍
 
That's an awesome option...way too much work. Lol. . ..but how do u fish the wiper fluid hoses and any wiring around that metal panel?
 
That's an awesome option...way too much work. Lol. . ..but how do u fish the wiper fluid hoses and any wiring around that metal panel?

What’s more time consuming? Having a broken HVAC out of warranty or actually dealing with the problem?

The hose runs beneath the windshield as it is. I actually had to cut a plastic clamp that I couldn’t remove to make the metal plate sit nicely. For the wiring, Ive made some holes at the very top of the sheet.

The bracket at the center is gone but quite honestly, you can’t tell when pushing the hood down. It also makes it a tiny bit less annoying to get the hood up with only two screws.

I will need to order extra connectors for the wires powering the nozzles. They are a bit too stretched to my liking.

Everything goes back together perfectly. Next time I think I’ll use a metal plate that is a tiny bit bigger in both directions. I’d like to cover the entire fuse box and get a tiny bit closer to the air intake.

I can post instructions if someone is interested. With those and basic mechanical skills, I’d say its about 8 hours at most.

You won’t have to worry about your service technician messing anything up when changing the polen filter.

///

Debating adding channels to divert the water away from the filter housing. At the very least, I'll add a piece of rubber as seen in the attachments and add some silicone.
 

Attachments

  • IMG_7595.webp
    IMG_7595.webp
    209.1 KB · Views: 77
  • IMG_7599.webp
    IMG_7599.webp
    173 KB · Views: 73
  • IMG_7603.webp
    IMG_7603.webp
    185.2 KB · Views: 75
Last edited:
Will be interesting to see if the 420 has any modifications that make the membrane redundant.
 
Will be interesting to see if the 420 has any modifications that make the membrane redundant.
I can't see why they would make any significant changes just for the 420 seeing as they could have by now long ago easily done something "better". Happy to be proved wrong once the 420 hits the streets.

The quick change they could do is replace the rubber material with something more durable like the neoprene ones that owners are creating.
 
I had the car in the other day and had it replaced, rumour is that there is an improved version that`s being put in cars but i don`t know whether i had an old one or an updated one or even if it exists. My dealer, B&C, is not very helpful in that regard!

If i open up the front would it be easy to tell? If so i`m happy to do it.
 
I had the car in the other day and had it replaced, rumour is that there is an improved version that`s being put in cars but i don`t know whether i had an old one or an updated one or even if it exists. My dealer, B&C, is not very helpful in that regard!

If i open up the front would it be easy to tell? If so i`m happy to do it.
The only way to know for sure is if you open up the front and remove the covers to expose the membrane. Then photo it and post here.

When I was at the factory in early June the cars on the production line appeared to have the same membrane being fitted.

Also the photos I've seen of cars on the production line from the Lotus Family Open Day on the 18th July again show a membrane that looks the same.

If there is something different being fitted in the last month it would have to be just a material change.
 

Create an account or login to comment

Join now to leave a comment enjoy browsing the site ad-free!

Create account

Create an account on our community. It's easy!

Log in

Already have an account? Log in here.

Supporting Vendors View all →
Back
Top