JB4 Thread for Lotus Emira AMG i4 (M139 Engine) – Tuning, Setup, Results & Support

Thank you so much for the pics. I agree, the cables from the JB4 module being the length they are do limit mounting positions. The ECU positioned above the air filter benefits from fresh cool air (we would hope) drawn through the external rear side duct. Finding something similar for the JB4 is a challenge.
Technically my location should have fresh air as the right side duct is being fan fed to that area
 
I have the bracket if anyone is intrested. Never Used
 
Hello everyone

I've been following this thread and finally got my JB4 delivered the other day. I followed the instructions but the intercooler would not budge at all, making it impossible (at least for me) to get to the second sensor. Apart from those 4 etorx bolts holding the intercooler, is there anything else that needs to be removed for the intercooler to move?

Any help would be greatly appreciated.

Thanks!
 
It’s easier to take the AC pump off. The sensor is easy to get too.
 
  • Like
Reactions: Lun
Any hints or guides on this? Even a couple of pictures would be enough.

Thanks!

I agree with the AC removal. It’s not easy, but doable. You need a Torx (“E” male fitting or even an Allen key (of the correct size) fitted to a ratchet, to move the belt tensioner clockwise to remove the belt. The location for the Torx or Allen key is the centre of the AC pulley. There is no lock bolt that keeps the tensioner in place, it relies on the spring for correct tension. Most of those tool fittings are 3/8 size and obtaining a breaker bar in 3/8 size is not readily available. You can do it with a normal length ratchet but having a piece of pipe to use as an extension to the ratchet is handy.
Once the bolt is off. It’s just a case of removing the three bolts holding the AC in place.
I’m sorry I can’t remember the Torx size. I’ll get back to you in the coming days after I go through the whole process again (Grrrrr) since despite what I thought was super careful checking, I may have not pushed one of the wire connection home carefully enough. This mis……..mis…….mistake (hard thing to acknowledge) on my part only came to light on completion and the first road test. So be extra vigilant when making these electrical connections.
 
  • Like
Reactions: Lun
I agree with the AC removal. It’s not easy, but doable. You need a Torx (“E” male fitting or even an Allen key (of the correct size) fitted to a ratchet, to move the belt tensioner clockwise to remove the belt. The location for the Torx or Allen key is the centre of the AC pulley. There is no lock bolt that keeps the tensioner in place, it relies on the spring for correct tension. Most of those tool fittings are 3/8 size and obtaining a breaker bar in 3/8 size is not readily available. You can do it with a normal length ratchet but having a piece of pipe to use as an extension to the ratchet is handy.
Once the bolt is off. It’s just a case of removing the three bolts holding the AC in place.
I’m sorry I can’t remember the Torx size. I’ll get back to you in the coming days after I go through the whole process again (Grrrrr) since despite what I thought was super careful checking, I may have not pushed one of the wire connection home carefully enough. This mis……..mis…….mistake (hard thing to acknowledge) on my part only came to light on completion and the first road test. So be extra vigilant when making these electrical connections.
Anything you can share will be most welcome!

I very reluctantly accepted defeat this weekend when I couldn't figure out how reach the sensor, but I'll put the car back on jack stands this coming weekend and try again.

Thanks!
 
Anything you can share will be most welcome!

I very reluctantly accepted defeat this weekend when I couldn't figure out how reach the sensor, but I'll put the car back on jack stands this coming weekend and try again.

Thanks!
I don’t want to tread on anyone’s toes, but to move the AC pulley you’ll need a T50 Torx bit, and to remove the compressor bolts you’ll need a E10 Torx socket 👍
 
I don’t want to tread on anyone’s toes, but to move the AC pulley you’ll need a T50 Torx bit, and to remove the compressor bolts you’ll need a E10 Torx socket 👍

Absolutely correct.
Thank you so much. At 4.00 am in the morning the brain has still not kicked in . Plus these bolt types…… what happened to all the old familiar just plain old sockets we once used. I’ve had to go out and buy a whole heap of new shapes “E” Torx “T” Torx talk, talk, talk…… I wonder if they will start making them in plastic? That’ll be handy for removing the engine, highly inspired sump plug on our AMG Emira’s.
 
Anything you can share will be most welcome!

I very reluctantly accepted defeat this weekend when I couldn't figure out how reach the sensor, but I'll put the car back on jack stands this coming weekend and try again.

Thanks!
It'll be worth it....car rips, especially in colder climates
 
Anything you can share will be most welcome!

I very reluctantly accepted defeat this weekend when I couldn't figure out how reach the sensor, but I'll put the car back on jack stands this coming weekend and try again.

Thanks!

I went through the whole ordeal again today. On first installation I got a Engine Check Light and Terry from Burger said in response last week “ I see a PSI signal but not a PSI2 signal, maybe one connector is noton properly. Photos of each connection?”
So, today re-did the whole wiring and connection installation. Carefully checked and re-did all from that difficult lower MAP sensor (Grrrrr) and back to the JB4 module. Started and ran on Map 0 no problem (as per the first install). Map 1&2 check light on, revel out ok, no torque (pull power). Sent logs to Terry, I wonder what’s next.
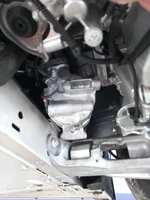
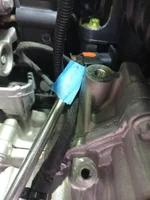
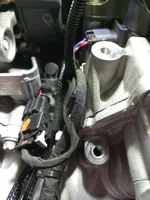
Anyway, while there I took photos for anyone wanting an idea of what is faced.
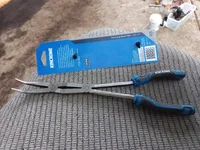
There is a picture of long extension (380mm) x 45 degree pliers which you may find useful, but with the AC unit swung out of the way, you can reach the MAP Sensor by hand. Ive included photos of the sensor (coloured orange) both before and after removal/re-configuration.
Making sure connections are strong and firm is the go (which Ive now done twice it would seem).
Getting the AC drive belt back on using that tensioner, is a job, friends will willingly line up for…….not!
Anyway hope any of this helps.
 

Attachments

  • IMG_0580.webp
    IMG_0580.webp
    61.5 KB · Views: 140
  • 1770806659288.webp
    1770806659288.webp
    405.9 KB · Views: 149
  • 1770806926065.webp
    1770806926065.webp
    94.1 KB · Views: 143
  • 1770806671513.webp
    1770806671513.webp
    239.9 KB · Views: 148
  • 1770806709230.webp
    1770806709230.webp
    225 KB · Views: 166
Guess the main issue with the JB4 approach for AMG car is, if you need to take the car into the dealership for repair....removal clearly isn't simple.
An improved system would be to intercept the Boost single at a wiring harness in a more assessable area; perhaps at the ECU.
 
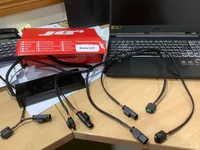
Greetings again. Has anyone installing a JB4 onto the 2.0 AMG, received the required extension wire connection from the brown wires coming from the JB4 module to the MAP Sensor, as a brown wired extension? Or are these extensions a combination of blue/black/red wires (seen on the right) in my delivery picture below?
 

Attachments

  • IMG_0557.webp
    IMG_0557.webp
    252.5 KB · Views: 121
Greetings again. Has anyone installing a JB4 onto the 2.0 AMG, received the required extension wire connection from the brown wires coming from the JB4 module to the MAP Sensor, as a brown wired extension? Or are these extensions a combination of blue/black/red wires (seen on the right) in my delivery picture below?
Those look right. One extension goes to the male connector of the map sensor by the hard to reach intercooler and the other to the female side of the map sensor and then those extensions connect to the 2 plugs that are facing opposite of each other. Take care of looking at the pins of the connector as those connector pins seem fairly fragile.
 
Help!!
I’ve just installed a JB4 to my 2.0 (360 HP) Emira, but have had issues with limp mode and CEL notifications.
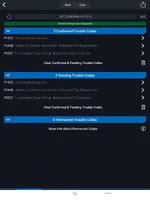
On first test run, Map 0 seemed fine, revs no problem, no limp mode. Changed Maps, limp mode kicked in around 3k to 4K revs. Backing off and then slowly depressing the accelerator, the revs rose and the limp mode faded away, but no significant increase in power. Floor the accelerator, and limp mode returned revs increased but no significant boost in torque. The fault codes read mostly PO237 turbo charger Boost sensor circuit ‘low’.
I then re-checked installation including all connections, particularly the cursed MAP connection; went to the extreme of even checking each wire for continuity of current.
For the next test run, I disconnected the OEM MAP plug at the “pig tail brown wire” connection point, leaving solely just the direct to JB4 MAP plug in place at the MAP sensor, with the thought that having both MAP plugs connected may cause a conflict.
After clearing the CEL fault the road test seemed fine, revs, no problem, no limp mode encountered. Turned the engine off (to refill with fuel). Turned the ignition on, and hey presto, back came the CEL again. I continued the road test (ignoring the glaring CEL) using all MAP choices no limp mode present, but noticeable lack of power (commensurate with the PO237 fault code).
Has any member having installed the JB4 to their 360 HP engine experienced the same problems?
I’m just wondering, while awaiting a reply from Terry Burger, whether the JB4 was developed/configured based on a 360 hp engine or the 400 hp unit as supplied to USA imported Emira’s.
Your thoughts and ideas for a solution are most welcome, before I unbolt the entire modual and feed it to the rubbish bin.
 
I have US car and had issue. Did you unplug extension harness from sensor? If so, did car run fine? If so, jb4 faulty.....I had issue, Terry sent new board, car rips
 
I have US car and had issue. Did you unplug extension harness from sensor? If so, did car run fine? If so, jb4 faulty.....I had issue, Terry sent new board, car rips

Thank you so much for your response. My car was running perfectly (no issues at all with anything) until installing the JB4. With CEL’s that have shown up, I did conclude the problem lays with the module unit itself. Your confirmation of the same gives me assurance that in the least, I’m not loosing my brain marbles.
I believe in my case, like yours, a replacement of the module is required, since every test and re-check of installation points to a faulty component.
Thank you again. Regards, Richard.
 
Thank you so much for your response. My car was running perfectly (no issues at all with anything) until installing the JB4. With CEL’s that have shown up, I did conclude the problem lays with the module unit itself. Your confirmation of the same gives me assurance that in the least, I’m not loosing my brain marbles.
I believe in my case, like yours, a replacement of the module is required, since every test and re-check of installation points to a faulty component.
Thank you again. Regards, Richard.
You got it....make sure you email Terry directly.
 
I went through the whole ordeal again today. On first installation I got a Engine Check Light and Terry from Burger said in response last week “ I see a PSI signal but not a PSI2 signal, maybe one connector is noton properly. Photos of each connection?”
So, today re-did the whole wiring and connection installation. Carefully checked and re-did all from that difficult lower MAP sensor (Grrrrr) and back to the JB4 module. Started and ran on Map 0 no problem (as per the first install). Map 1&2 check light on, revel out ok, no torque (pull power). Sent logs to Terry, I wonder what’s next.
Anyway, while there I took photos for anyone wanting an idea of what is faced.
There is a picture of long extension (380mm) x 45 degree pliers which you may find useful, but with the AC unit swung out of the way, you can reach the MAP Sensor by hand. Ive included photos of the sensor (coloured orange) both before and after removal/re-configuration.
Making sure connections are strong and firm is the go (which Ive now done twice it would seem).
Getting the AC drive belt back on using that tensioner, is a job, friends will willingly line up for…….not!
Anyway hope any of this helps.

Thank you very much for the pictures. These are very helpful!

Greetings again. Has anyone installing a JB4 onto the 2.0 AMG, received the required extension wire connection from the brown wires coming from the JB4 module to the MAP Sensor, as a brown wired extension? Or are these extensions a combination of blue/black/red wires (seen on the right) in my delivery picture below?

I got mine in January 2026 and it looks exactly like that. The box with the cables and two extensions.

Help!!
I’ve just installed a JB4 to my 2.0 (360 HP) Emira, but have had issues with limp mode and CEL notifications.
On first test run, Map 0 seemed fine, revs no problem, no limp mode. Changed Maps, limp mode kicked in around 3k to 4K revs. Backing off and then slowly depressing the accelerator, the revs rose and the limp mode faded away, but no significant increase in power. Floor the accelerator, and limp mode returned revs increased but no significant boost in torque. The fault codes read mostly PO237 turbo charger Boost sensor circuit ‘low’.
I then re-checked installation including all connections, particularly the cursed MAP connection; went to the extreme of even checking each wire for continuity of current.
For the next test run, I disconnected the OEM MAP plug at the “pig tail brown wire” connection point, leaving solely just the direct to JB4 MAP plug in place at the MAP sensor, with the thought that having both MAP plugs connected may cause a conflict.
After clearing the CEL fault the road test seemed fine, revs, no problem, no limp mode encountered. Turned the engine off (to refill with fuel). Turned the ignition on, and hey presto, back came the CEL again. I continued the road test (ignoring the glaring CEL) using all MAP choices no limp mode present, but noticeable lack of power (commensurate with the PO237 fault code).
Has any member having installed the JB4 to their 360 HP engine experienced the same problems?
I’m just wondering, while awaiting a reply from Terry Burger, whether the JB4 was developed/configured based on a 360 hp engine or the 400 hp unit as supplied to USA imported Emira’s.
Your thoughts and ideas for a solution are most welcome, before I unbolt the entire modual and feed it to the rubbish bin.

Did you get any feedback from them? Mine is a 360hp version as well. I was planning to install it on Monday but I'm not sure if I want to go through the whole ordeal twice 😅

Has anyone else experienced problems with JB4 and the 2.0 i4 360 HP version?

Thanks!
 

Create an account or login to comment

Join now to leave a comment enjoy browsing the site ad-free!

Create account

Create an account on our community. It's easy!

Log in

Already have an account? Log in here.

Supporting Vendors View all →
Back
Top