I'd like to thank @kitkat and @Eagle7 for this ridiculously helpful tweak. My shifts are significantly smoother! 
I'd recommend this to ANYONE whose Reverse/1/2 shifts are more difficult than 3-4-5-6. I think the moderators should make this a sticky thread (not sure how to "at" them?)
I didn't think I "needed" to do this tweak, and I was very reluctant about pulling my console apart. I shouldn't have been. My biggest pet peeve about the car has been 1st-2nd has always felt like stirring a stick in a bucket of stones, and reverse feels like putting a truck in reverse. I've heard the transmission is the same one used in a truck, and every review has said it's a bit clunky and can't be "rushed". As long as I shifted slowly the gears have gone in, so I figured I'd be pulling apart my dash for no reason, or worse doing something that might leave me stranded on the side of the road. Kitkat's instructions and video are excellent and it's not nearly as daunting a task as it seems.
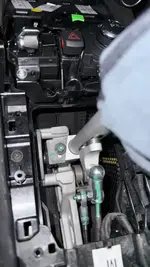
Obviously this factory-set plate position varies by car, and Lotus factory tech, and how rushed they were, but here's where mine was set from the factory:
View attachment 65187
Pretty much as far back as it could go!
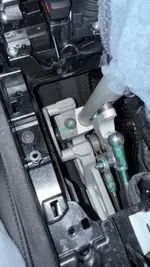
And here's where I've set it now using the super-helpful Lotus technical manual page instructions
@Eagle7 inserted early on to the thread. As per the manual, this position when in first gear "shoves the stick slightly to the right":
View attachment 65188
The angles are different in these shots but you can see the mark of the washer in the second shot how I moved the plate forward 2-3mm.
I did not need to clip the ziptie for the surround, or even unplug the starter button. Just pulled out the bit of extra wire stuffed down in the hole, and make sure you pull the console up all the way so the shift boot exposes the zip tie. No need to cut it, it just gives you plenty of room to work:
View attachment 65189
I'm going to attach a video here of how this plate contacts the reverse-lockout on the left. This may help some people who haven't done it visualize what this plate is doing. Note when you watch it how my plate only contacts at the upper-left corner for N to 1st gear, but the plate moves to sit flush against it when moving into 2nd. I'll get to that in the second attached video.
View attachment 65191
One potential issue I noted was that the whole adjustment plate is screwed down to that the silver metal block, which is attached to the silver "sleeve" around the actual shift post. You can twist the angle of this whole assembly a small amount by twisting the sleeve (see the video below), which makes a big difference in whether the plate hits with its full length flush, or just on one corner or another. The plate appears to be made of a tough plastic like Delrin, which will wear. I think this is why some users said they saw "metal shavings" after several thousand miles, or that the shifts eventually 'got smoother'. My guess is this is the Delrin wearing down, which is softer and better than metal shavings wearing and getting into your linkage, but ideally the contact/wear would be spread evenly along the length of the plastic plate. I can see some wear marks on the lockout bar itself at the left, which I believe is from the underside of the Delrin plate every time it's actually moved to/from reverse.
View attachment 65190
My question for the brains here: anyone know of a way to stop the "wiggle" in the silver sleeve? Having it align flush with the reverse-lockout seems fairly important to how it will wear over time. Mine sits flush going into second, wearing at the upper-left corner going into first.
End result: big improvement in N-1 and 1-2 shifts. 2-3rd is now "like buttah". In general, 1-2 now feels a lot more like the rest of the gears. Reverse is still a little difficult to get into once in a while, so I may need to move it even a bit further forward, or that may just be the way it is.
Thanks again for this hugely helpful thread! This is the best of what car forums can be: kind people sharing a tip that helps many others!
")
PS - I'd add a flashlight, or better yet a headlamp to the list of tools needed. Made a world of difference trying to see the black-on-black tab of the console, and lighting down in the shifter linkage. Camera to document before/after positions of things is helpful too. Thanks for the tip to wear gloves to pull up the metal console tab. It does take some force to lift up and I would surely have cut my fingers without that great tip!