DIY: Floating Console Modification

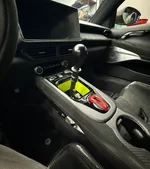
Finished up the floating console mod, including the shift boot delete from GRP and modifying an automatic console tray. Instead of measuring and cutting the rubber mat, I installed the shifter support block and applied white lithium grease to the top, then placed the mat over that to leave a perfect print on the bottom. Then it's as simple as cutting around the print with a scalpel. Came out great.

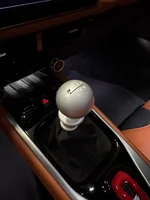
Also love the new shift knob which is fully customizable with different base colors, leather colors, or alcantara. Once it's officially available I'll make a post about it (not affiliated with the seller, but they used my car to test fit).

View attachment 72146View attachment 72147
That looks a lot like a Black Forest shift knob. A while back, a number of us tried to coerce them into supporting the Emira with their products but at the time had no luck. Hopefully it is theirs, as they are very customizable and look like a nice product.
 
That looks a lot like a Black Forest shift knob. A while back, a number of us tried to coerce them into supporting the Emira with their products but at the time had no luck. Hopefully it is theirs, as they are very customizable and look like a nice product.
There's going to be an announcement at 2:00PM today from BFI about releasing shift knobs for a new car ;-)
 
How would different materials and thicknesses of the "mustache" plate change the shift feeling?
 
How would different materials and thicknesses of the "mustache" plate change the shift feeling?
Mustache is for 1-2 and reverse lock out. Changing should be easy just make aure you change to a material thickness that is similar to the steel and its thickness for rigidity.
 
Mustache is for 1-2 and reverse lock out. Changing should be easy just make aure you change to a material thickness that is similar to the steel and its thickness for rigidity.
Just wondering how a piece of metal (same thickness steel) without the cutout "springs" would feel like, if it did make any difference. Stainless steel in the OEM dimensions would be nice and shiny but retain pretty much the same feel (if there is any difference).
Gotta remove the grilles first...
 
I did the floating shifter about 9 months ago, and this new tray motivated me to dive back in to give it a more finished look. It took me less than an hour the first time so I thought this would be similarly quick. Sadly I was mistaken, and I was swearing the in garage for over 2 hours 😂 mostly due to the repeat measuring, cutting, and struggling to fit the tray beneath the shifter mechanism without taking apart half the console again.
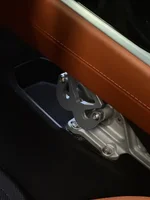
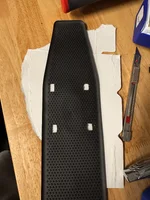
There are clips beneath the outer lip of the tray that are supposed to click into tabs inside the felt liner that didn't line up for me. The passenger side tab was about 2mm out of alignment no matter what I tried, and therefore left a noticeable gap between the tray and liner on that side. Fortunately, bolting down the five M6 bolts under the rubber tray liner did help shrink the gap to half what it was and it's now more acceptable.

I decided to use some silver brake caliper enamel on the "mustache" plate instead of polishing, and it's a close enough match to the rest of the linkages. I prefer a shift boot to the gaping hole that others here have done, so I just replaced mine with an alcantara+ grey stitching version to match my custom steering wheel. Thanks for those here who provided helpful instructions! Some low quality, poorly lit photos attached.
 

Attachments

  • IMG_9634.webp
    IMG_9634.webp
    92.1 KB · Views: 352
  • IMG_9632.webp
    IMG_9632.webp
    199.1 KB · Views: 295
  • IMG_9637.webp
    IMG_9637.webp
    56.4 KB · Views: 294
Last edited:
There are clips beneath the outer lip of the tray that are supposed to click into tabs inside the felt liner that didn't line up for me. The passenger side tab was about 2mm out of alignment no matter what I tried, and therefore left a noticeable gap between the tray and liner on that side. Fortunately, bolting down the five M6 bolts under the rubber tray liner did help shrink the gap to half what it was and it's now more acceptable.
I had the same issue with this also, something below the tray must just not be aligned properly on some vehicles. Still a great mod though.
 
I did the floating shifter about 9 months ago, and this new tray motivated me to dive back in to give it a more finished look. It took me less than an hour the first time so I thought this would be similarly quick. Sadly I was mistaken, and I was swearing the in garage for over 2 hours 😂 mostly due to the repeat measuring, cutting, and struggling to fit the tray beneath the shifter mechanism without taking apart half the console again.

There are clips beneath the outer lip of the tray that are supposed to click into tabs inside the felt liner that didn't line up for me. The passenger side tab was about 2mm out of alignment no matter what I tried, and therefore left a noticeable gap between the tray and liner on that side. Fortunately, bolting down the five M6 bolts under the rubber tray liner did help shrink the gap to half what it was and it's now more acceptable.

I decided to use some silver brake caliper enamel on the "mustache" plate instead of polishing, and it's a close enough match to the rest of the linkages. I prefer a shift boot to the gaping hole that others here have done, so I just replaced mine with an alcantara+ grey stitching version to match my custom steering wheel. Thanks for those here who provided helpful instructions! Some low quality, poorly lit photos attached.

Best mustache solution yet!

giphy.gif
 
  • Like
Reactions: ADC
Well I’ve been on the fence with this mod for a while, always loved the look and idea, at first I didn’t like having places where things can fall in so i haven’t gone through but when you guys came with the genuinely brilliant idea of using the auto plastic tray i caved.
The tray has arrived, within a week and a half (shout out to bell and colvill), and i needed the boot delete. I didn’t know if to go plastic or aluminum and I first asked a friend to print it out in plastic but he told me his printer doesn’t work and sent me the site craftcloud, then I saw there is a option to print in AlMg10Sl (aluminum for SLM/DSLM) and it was dirt cheap with sand/glass blasting included (for 50$, just the shipment was 20-25$) so I gambled haha getting it from the US would have cost me around 250$ at least with shipping VAT, to my surprise WOW the fit and finish are crazy and arrived after 2 weeks from order! Added pictures, haven’t had time for the cage and tray but will tackle it in the upcoming week probably.
The boot delete was really simple especially thanks for @kitkat s guide and especially for the tray and cage mod, btw I used @aBigMouse file which was spot on so thanks as well.
IMG_9975.webp
7482FE2B-E9F2-4A0C-93FB-B9334674E6C3.webp
280DD7F3-248A-41E8-87AB-D239F583AB91.webp
D200BC8F-7FE8-4366-A22B-BA5855AAD23D.webp
IMG_9974.webp
 
Quick snap of our shop car with the floating console mod.
Auto lower tray coming in tomorrow, then some black cable end fittings and it will be complete.
 

Attachments

  • IMG_1845.webp
    IMG_1845.webp
    171.5 KB · Views: 296
Quick snap of our shop car with the floating console mod.
Auto lower tray coming in tomorrow, then some black cable end fittings and it will be complete.
:love::love::love:

Greg you're color matching all of the things with your new car! I hope for your wife's sake you're not also remodeling the bathrooms.
 
:love::love::love:

Greg you're color matching all of the things with your new car! I hope for your wife's sake you're not also remodeling the bathrooms.
Haha! Isotope everything!
 
Quick snap of our shop car with the floating console mod.
Auto lower tray coming in tomorrow, then some black cable end fittings and it will be complete.
Loving the colour coordination and the CF replacement for the piano black cup holder. Is it a Jogon part? I wonder if they'd make one for the piano black part of the gear shifter surround but leave the aluminium intact. 🤔
 
  • Like
Reactions: GRP
Loving the colour coordination and the CF replacement for the piano black cup holder. Is it a Jogon part? I wonder if they'd make one for the piano black part of the gear shifter surround but leave the aluminium intact. 🤔
Yeah, we carry all of the jogon items here.
I dont think they plan on making anymore interior parts for the Emira but I can always check.
 
forgive my ignorant question as i am not familiar enough with the car to know better - but am I right in thinking that if you cut the lower mesh trim in order to remove it, one could avoid all the steps taking apart the dash etc?

many thanks
 
forgive my ignorant question as i am not familiar enough with the car to know better - but am I right in thinking that if you cut the lower mesh trim in order to remove it, one could avoid all the steps taking apart the dash etc?

many thanks

Yes, it's obviously destructive but that's how I'd approach it unless I was critically worried about having it back 100% to stock for resale value or something.

Looking at 30 minute install time that way.
 
Yes, it's obviously destructive but that's how I'd approach it unless I was critically worried about having it back 100% to stock for resale value or something.

Looking at 30 minute install time that way.
Thank you for the reply & congrats on such a great mod!

So just to make sure i'm not misunderstanding - if i did nothing other than cut the mesh, I would still be able to:

- remove the gaiter (shift boot)
- install the 3d printed piece


& achieve the same floating mod outcome?

appreciate your patience, thank you
 
Thank you for the reply & congrats on such a great mod!

So just to make sure i'm not misunderstanding - if i did nothing other than cut the mesh, I would still be able to:

- remove the gaiter (shift boot)
- install the 3d printed piece


& achieve the same floating mod outcome?

appreciate your patience, thank you

Yes:

I'd start by lifting up the top control panel plastic first to remove the boot and install the 3d printed or cnced piece, just wait on reinstalling the whole upper panel while you do the mesh, doing so will give you more access to the inside of the assembly area.

Then I would start to cut away at the mesh and then twist and cut the plastic surrounding he mesh. This is what you're aiming to remove.

1766536274565.webp


Then finally I'd reattach the top piece to the top of the console.
 
Yes:

I'd start by lifting up the top control panel plastic first to remove the boot and install the 3d printed or cnced piece, just wait on reinstalling the whole upper panel while you do the mesh, doing so will give you more access to the inside of the assembly area.

Then I would start to cut away at the mesh and then twist and cut the plastic surrounding he mesh. This is what you're aiming to remove.

View attachment 75012

Then finally I'd reattach the top piece to the top of the console.
Thank you so much :cool:

The worry about me getting something wrong & ruining something that was already working perfectly has been making me hesitant to give this a go - this way seems much more approachable to me - i will give this method a try, & hopefully have it looking nearly as good as all your guys!

Appreciate it kitkat
🍻
😎
🙌
 

Create an account or login to comment

Join now to leave a comment enjoy browsing the site ad-free!

Create account

Create an account on our community. It's easy!

Log in

Already have an account? Log in here.

Supporting Vendors View all →
Back
Top