Unfortunately I’m addicted and look at almost all Forum posts, so I’d already seen yours some time ago. My preference is to do the easier and less expensive single tweeter mod, outlined in this particular thread. Best of luck selling your speaker mounts that I know you worked hard to create, which will no doubt result in better sound with the right speakers.
Navigation
Install the app
How to install the app on iOS
Follow along with the video below to see how to install our site as a web app on your home screen.
Note: This feature may not be available in some browsers.
More options
Style variation
You are using an out of date browser. It may not display this or other websites correctly.
You should upgrade or use an alternative browser.
You should upgrade or use an alternative browser.
Initial Results after adding Tweeters
- Thread starter Chriscpm
- Start date
Here are some useful materials and tools that I used which you can consider getting (all available on Amazon) should you not already have them.I’m relying upon the advice from this thread for my install, so I’ll encourage everyone to post as many helpful pointers as possible. I’m now just waiting for the clamps that I’ve ordered before doing this “Emira surgery” (lol). Your guidance is invaluable, MUCH appreciated, and makes this Forum the best tool in my toolbox! TY x 10!!
I used this to poke a guiding marker hole on the small plastic tabs of the tweeter housing in the A-pilar trim. Since it's a small tab it will help center the drill bit when making the hole for the zip ties.
This I used for the delicate surgical cutting of the speaker wire cloth wrap.
This is to wrap the wiring once you tapped into the wires.
Would anyone happen to have the wiring colors for the tweeter signals +/-?
I see referenced:
Drivers side - signal wires are Blue/white stripe and purple, unsure of polarity.
Passenger side - signal wires are yellow/white stripe and purple/green stripe, unsure of polarity.
I see referenced:
Drivers side - signal wires are Blue/white stripe and purple, unsure of polarity.
Passenger side - signal wires are yellow/white stripe and purple/green stripe, unsure of polarity.
Last edited:
Would anyone happen to have the wiring colors for the tweeter signals +/-?
I see referenced:
Drivers side - signal wires are Blue/white stripe and purple, unsure of polarity.
Passenger side - signal wires are yellow/white stripe and purple/green stripe, unsure of polarity.
Solid Blue -> negative
Purple/White Stripe -> positive
Sold Yellow -> negative
Purple/Green Stripe -> positive
Hi Kaz,Anyone know what ohm rating the front door speakers are running at? I read the mid driver is powered separately from the tweeter but havent found the ohm rating on either/both, thanks! (I did try search as well nothing came up)
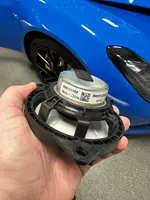
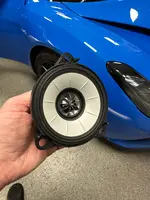
Luckily I had all these pictures from a previous request - please see the attached.
Hopefully this is the info you're seeking
Please note: -
IMG_0678 - Main Speaker (Drivers Door)
IMG_0679 - Main Speaker (Passenger Door)
IMG_0681 is a REAR Speaker.
IMG_0682 - Tweeter (Passenger Door)
Attachments

Hi Kaz,
Luckily I had all these pictures from a previous request - please see the attached.
Hopefully this is the info you're seeking
Please note: -
IMG_0678 - Main Speaker (Drivers Door)
IMG_0679 - Main Speaker (Passenger Door)
IMG_0681 is a REAR Speaker.
IMG_0682 - Tweeter (Passenger Door)
 thank you!
I’m just finishing my driver side door: insulation and Alpine tweeter. First time I’ve ever done these mods. I owe it all to others who started and contributed to this thread (THANKS!!). I’ll post a few comments, in case it helps others who take on these tasks.
For those of you with a service manual, the obvious reference pages to take apart the door are 15-10 and 15-11. The not so obvious pages are 11-12 and 11-13. Those latter pages explain the trick of pushing the rubber grommets (followed by all disconnected wiring) into the inner door. They also mention disengaging 2 clips, whereas there were a lot more clips: the wiring had to be detached from all.
First off, be prepared to devote ++ time. The sound deadening install is a very tedious/detailed job, so you need patience and an understanding spouse, with tools spread out in the garage and (for me) door pieces in the house, to work on while watching TV. I used a combo of “rubber-backed”/foil/adhesive material (Hushmat brand) and foam/adhesive material (generic brand from Amazon). Here’s 2 photos: one showing the inside of the driver door, and the other the cabin-facing inner door card, as finished. There's many different methods you can use to install the insulation, looking at the photos posted by others and the various YouTube videos. I expect they all achieve the same result. What I did, made a noticeable difference to quiet the door sound resonance.


Reassembling the door, it was a !#\! pain in the butt, to reinstall the 3-screw window motor. I finally made it work, using 3.5” deck screws, to reach further in and snag each of the 3 white plastic inner ends (that the black screws go into), to pull the inner half of the door window assembly close enough, to carefully substitute one at a time, each black mounting screw. You know it’s worked when the inner assembly and outer motor, click into place. See photo showing 2 brown 3.5” deck screws in place, plus the one black screw installed. Using a long blade screwdriver in the gap to better wriggle the inner door motor assembly into position (not shown in any photo), also helped.

The tweeter connection wiring was a challenge, due to the restricted work space, once the protected wiring sheath, was slowly/carefully cut through to expose the wiring. Below is a photo showing the razer-edged cutting tool I used and the “medical clamp” which came in handy to pull away pieces of the cut protective wiring sheath and grab the wires. I had purchased connectors used by others but ultimately used small blue-size wireguards (some call them marrettes; not shown in any photo) to join the old with new wires. Choose whatever works best for you, although some may correctly point out the wireguards/marrettes aren’t waterproof. I wrapped the new connections with regular vinyl electrical tape, followed by cloth electrical tape over everything to avoid any rattles from vibrating wiring hitting any of the harder interior surfaces.

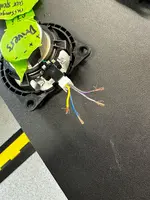
For the driver-side door (left-hand steering) I spliced into the (solid) purple wire and the blue/white wire, ID’d by others. They were found intertwined together, as shown in the attached photo. For new info, the purple wire is the negative one, that you attach to the negative black-lined Alpine tweeter speaker wire. That leaves the blue/white having positive polarity. I may post other tips and photos as the job progresses. I plan to ID the polarity of the passenger side speaker wiring (yellow/white vs purple/green), once I figure it out. Hope this helps.

For those of you with a service manual, the obvious reference pages to take apart the door are 15-10 and 15-11. The not so obvious pages are 11-12 and 11-13. Those latter pages explain the trick of pushing the rubber grommets (followed by all disconnected wiring) into the inner door. They also mention disengaging 2 clips, whereas there were a lot more clips: the wiring had to be detached from all.
First off, be prepared to devote ++ time. The sound deadening install is a very tedious/detailed job, so you need patience and an understanding spouse, with tools spread out in the garage and (for me) door pieces in the house, to work on while watching TV. I used a combo of “rubber-backed”/foil/adhesive material (Hushmat brand) and foam/adhesive material (generic brand from Amazon). Here’s 2 photos: one showing the inside of the driver door, and the other the cabin-facing inner door card, as finished. There's many different methods you can use to install the insulation, looking at the photos posted by others and the various YouTube videos. I expect they all achieve the same result. What I did, made a noticeable difference to quiet the door sound resonance.
Reassembling the door, it was a !#\! pain in the butt, to reinstall the 3-screw window motor. I finally made it work, using 3.5” deck screws, to reach further in and snag each of the 3 white plastic inner ends (that the black screws go into), to pull the inner half of the door window assembly close enough, to carefully substitute one at a time, each black mounting screw. You know it’s worked when the inner assembly and outer motor, click into place. See photo showing 2 brown 3.5” deck screws in place, plus the one black screw installed. Using a long blade screwdriver in the gap to better wriggle the inner door motor assembly into position (not shown in any photo), also helped.
The tweeter connection wiring was a challenge, due to the restricted work space, once the protected wiring sheath, was slowly/carefully cut through to expose the wiring. Below is a photo showing the razer-edged cutting tool I used and the “medical clamp” which came in handy to pull away pieces of the cut protective wiring sheath and grab the wires. I had purchased connectors used by others but ultimately used small blue-size wireguards (some call them marrettes; not shown in any photo) to join the old with new wires. Choose whatever works best for you, although some may correctly point out the wireguards/marrettes aren’t waterproof. I wrapped the new connections with regular vinyl electrical tape, followed by cloth electrical tape over everything to avoid any rattles from vibrating wiring hitting any of the harder interior surfaces.
For the driver-side door (left-hand steering) I spliced into the (solid) purple wire and the blue/white wire, ID’d by others. They were found intertwined together, as shown in the attached photo. For new info, the purple wire is the negative one, that you attach to the negative black-lined Alpine tweeter speaker wire. That leaves the blue/white having positive polarity. I may post other tips and photos as the job progresses. I plan to ID the polarity of the passenger side speaker wiring (yellow/white vs purple/green), once I figure it out. Hope this helps.
Last edited:
Nice job. Good advice on using those longer screws to pull the window regulator in and then install the stock screws. That was the hardest part for me.I’m just finishing my driver side door: insulation and Alpine tweeter. First time I’ve ever done these mods. I owe it all to others who started and contributed to this thread (THANKS!!). I’ll post a few comments, in case it helps others who take on these tasks.
For those of you with a service manual, the obvious reference pages to take apart the door are 15-10 and 15-11. The not so obvious pages are 11-12 and 11-13. Those latter pages explain the trick of pushing the rubber grommets (followed by all disconnected wiring) into the inner door. They also mention disengaging 2 clips, whereas there were a lot more clips: the wiring had to be detached from all.
First off, be prepared to devote ++ time. The sound deadening install is a very tedious/detailed job. I used a combo of “rubber-backed”/foil/adhesive material (Hushmat brand) and foam/adhesive material (generic brand from Amazon). Here’s 2 photos: one showing the inside of the driver door, and the other the cabin-facing inner door card, as finished.
View attachment 61917
View attachment 61918
Reassembling the door, it was a !#\! pain in the butt, to reinstall the 3-screw window motor. I finally made it work, using 3.5” deck screws, to reach further in and snag each of the 3 white plastic inner ends (that the black screws go into), to pull the inner half of the door window assembly close enough, to carefully substitute one at a time, each black mounting screw. You know it’s worked when the inner assembly and outer motor, click into place. See photo showing 2 brown 3.5” deck screws in place, plus the one black screw installed. Using a long blade screwdriver in the gap to better wriggle the inner door motor assembly into position, also helped.
View attachment 61919
The tweeter connection wiring was a challenge, due to the restricted work space, once the protected wiring sheath, was slowly/carefully cut through to expose the wiring. Below is a photo showing the razer-edged cutting tool I used and the “medical clamp” which came in handy to pull away pieces of the cut protective wiring sheath and grab the wires. I had purchased connectors used by others but ultimately used small blue-size wireguards to join the old with new wires. Choose whatever works best for you, although some may correctly point out the wireguards aren’t waterproof.
View attachment 61922
For the driver-side door (left-hand steering) I spliced into the (solid) purple wire and the blue/white wire, ID’d by others. They were found intertwined together, as shown in the attached photo. For new info, the purple wire is the negative one, that you attach to the negative black-lined Alpine tweeter speaker wire. I may post other tips and photos as the job progresses. Hope this helps.
View attachment 61923
Both door insulation and tweeter install completed. Easier to do second side with experience, as expected. For N. American vehicles, the passenger side wiring is the braided yellow/white and purple/green, as indicated by others, if you’re hooking up to OEM tweeters. For new info, the purple/green is the negative.
As before, it was a challenge to remove the upper side moulding where the new tweeter went. The upper clip (of 2) was ++ difficult to detach. KJWEmira was kind enough to post photos showing the clip. I tried squeezing it with a “medical clamp” but it kept slipping off. A clamp longer than the 7” one I had, may have worked better. I’m posting more close-up photos showing that “upper clip from hell”, in case it helps others. I just kept jiggling/pulling and eventually it detached, almost breaking the black plastic base where the clip inserted.


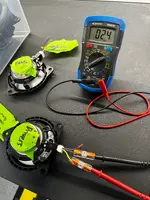
The wiring splice was again fun to do, since the original wiring is so tight and the working space small. I did better this second time round, by cutting 4 new 5” lengths of wire (2 negative and 2 positive, using the wires from the tweeter kit that aren’t needed), and splicing them onto the cut ends of the original wires. This gave the extra length that made it easier to work with the wires. I also used the solder seal connectors recommended by Crestima and regret not using them on the driver side. They worked great. Thanks again Crestima (and KJWEmira). Some wiring photos below showing what I did.
A fun job but very satisfying with everything put back together, working and looking OEM.


As before, it was a challenge to remove the upper side moulding where the new tweeter went. The upper clip (of 2) was ++ difficult to detach. KJWEmira was kind enough to post photos showing the clip. I tried squeezing it with a “medical clamp” but it kept slipping off. A clamp longer than the 7” one I had, may have worked better. I’m posting more close-up photos showing that “upper clip from hell”, in case it helps others. I just kept jiggling/pulling and eventually it detached, almost breaking the black plastic base where the clip inserted.
The wiring splice was again fun to do, since the original wiring is so tight and the working space small. I did better this second time round, by cutting 4 new 5” lengths of wire (2 negative and 2 positive, using the wires from the tweeter kit that aren’t needed), and splicing them onto the cut ends of the original wires. This gave the extra length that made it easier to work with the wires. I also used the solder seal connectors recommended by Crestima and regret not using them on the driver side. They worked great. Thanks again Crestima (and KJWEmira). Some wiring photos below showing what I did.
A fun job but very satisfying with everything put back together, working and looking OEM.
Just to be clear - is this supposed to be Yellow/White -> negative? Found conflicts in my notes, while compiling an instruction document built from various posts, and have built up a bit of nerves before cutting any wires.Sold Yellow -> negative
Purple/Green Stripe -> positive
Combining your wiring notation (and pictures) with @Chriscpm notations in post #30 would my following notes be correct?
Right speaker
Main - blue and purple/white
Tweeter - yellow/white (negative) and purple/green (positive) --- (yellow/white based on @crestima picture, not solid yellow)
Left speaker
Main - purple/brown and blue/yellow
Tweeter - blue/white (negative) and purple/dark purple (positive) --- (purple/dark purple based on @crestima driver side picture)
Additionally, @Chriscpm indicated he tapped the main signal wires vs. the tweeter wires - can that be confirmed, as well as the colors and polarity on the main signal wires?
Really appreciate all the guidance, I may be confusing myself here (letting my documentation OCD run the show) which is why I am asking..
Last edited:
You need to be careful when using this thread to install new Alpine tweeters. First off, any reference to "left/right" in the thread, is from the perspective of a left-hand drive vehicle, so left is the "driver side" and right is the "passenger side". As well, this thread refers to the "upgraded" KEF audio system, found standard in the "First Edition Emira". Two Forum members both used speaker wiring that originates from the interior door speaker, which has both a midrange and a tweeter in it. I understand that Chriscpm refers to the midrange as the "main speaker", separately from its tweeter portion. That said, each Forum member hooked up the wiring differently:Just to be clear - is this supposed to be Yellow/White -> negative? Found conflicts in my notes, while compiling an instruction document built from various posts, and have built up a bit of nerves before cutting any wires.
Combining your wiring notation (and pictures) with @Chriscpm notations in post #30 would my following notes be correct?
Right speaker
Main - blue and purple/white
Tweeter - yellow/white (negative) and purple/green (positive) --- (yellow/white based on @crestima picture, not solid yellow)
Left speaker
Main - purple/brown and blue/yellow
Tweeter - blue/white (negative) and purple/dark purple (positive) --- (purple/dark purple based on @crestima driver side picture)
Additionally, @Chriscpm indicated he tapped the main signal wires vs. the tweeter wires - can that be confirmed, as well as the colors and polarity on the main signal wires?
Really appreciate all the guidance, I may be confusing myself here (letting my documentation OCD run the show) which is why I am asking..
1. Chriscpm (the OP or person who started this thread) method: he hooked up the new tweeters, to both the door midrange/aka "main speaker" (2 wires: colored blue and purple/white, for the right side, and purple/brown and blue/yellow, for the left side) and the door tweeter speaker (2 wires: colored yellow and purple/green for the right side, and blue and purple for the left side). So he taps into 4 wires on each side (8 in total) and doesn't mention polarity: see his past post #30 on this thread.
2. Crestima method: he hooked up the new tweeters, to only the door tweeter wiring, or at least that's all he mentioned. So 2 wires being yellow/white stripe and purple/green stripe, for the right side, and purple and blue/white stripe, for the left side. He taps into only 2 wires on each side (4 in total). He doesn't mention the polarity of all those wires. Check out his past posts #50 and #51, on this thread.
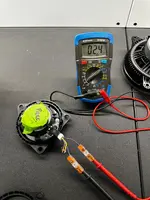
Anyone doing this tweeter addition, will have to decide which method they follow. I chose the Crestima method and when doing so, figured out the polarity, for the same wiring Crestima tapped into:
-right/passenger side:
---OEM yellow/white stripe = POSITIVE
---OEM purple/green stripe = NEGATIVE
-left/driver side:
---OEM blue/white stripe = POSITIVE
---OEM purple = NEGATIVE
Since I didn't use Chriscpm's method, I can't comment on the polarity of the other 4 wires, he tapped into (sorry).
At least this is my interpretation of this thread and I invite Chriscpm and Crestima, to correct me, if wrong. Both my new Alpine tweeters seem to be working AOK, after having tapped into 4 wires (not 8, like Chriscpm).
FWIW: the KEF "upgraded" audio system has in the rear side panels of the car:
-subwoofer on lower right/passenger side (at very bottom)
-midrange (?; I assume) speaker on same right/passenger side (about half way up)
-midrange (?; I assume) speaker on left/driver side (about half way up)
With the 2 door speakers, that's it for OEM speakers, in the First Edition (5 in total). There's another Forum thread, to install a new subwoofer and many who did it (me included) installed a Kicker 10" subwoofer...with some disconnecting the OEM subwoofer and others (like me) leaving it connected, with the new Kicker. BTW: what a difference the Kicker makes!!
I mention the above about the new tweeters, since I think some of Medic518's wiring ID above, is incorrect and I invite him to consider this post and look back at the posts done by Chriscpm and Crestima, that I've referenced above. Perhaps the mix-up is because the 2 methods of new tweeter installation on this thread, weren't recognized or because they confused things (?) and the polarity not always ID'd by both Chriscpm and Crestima (?). Hope this helps and doesn't further muddy the water. My apologies in advance, if I misinterpreted something...
Hi Folks,
I used the color codes mentioned above by @netsinah having researched how Lotus generally codes their speaker wiring.
Particularly as it pertains to tweeter wiring, the polarity is not really that important, unless you reverse the polarity on one of the tweeters, but not the other. In that case it may result in some sound distortion/loss of quality.
Hope you find this helpful.
This is EXACTLY the clarity I was looking for.. I knew I had something off, just could not put my finger on it. Good call out on Left vs Right had drive - I was actually looking at the flags next to usernames, because I thought that may have been causing my confusion - but your post cleared everything up. Thank you!I think some of Medic518's wiring ID above, is incorrect
I have looked at the Kicker upgrade posts, including the detailed video in one post. However, I am going to tackle the disconnecting of the RPM signal amp wire and see what difference that makes first (read the i4 pumped in engine noise thread)..
- Thread starter
- #76
1. Chriscpm (the OP or person who started this thread) method: he hooked up the new tweeters, to both the door midrange/aka "main speaker" (2 wires: colored blue and purple/white, for the right side, and purple/brown and blue/yellow, for the left side) and the door tweeter speaker (2 wires: colored yellow and purple/green for the right side, and blue and purple for the left side). So he taps into 4 wires on each side (8 in total) and doesn't mention polarity: see his past post #30 on this thread.
I only use 4 wires. I tap into the main (midrange). That is how the corvette C8 was wired. It worked fine.
The other option to use the tweeter wires would mean tweeters (the stock and the new Alpine) are run from each channel. That doesn't make sense to me, but they sound basically the same. Crestima and I did back to back comparisons. I suspect the tweeter wires are just tapped inside somewhere and don't have their own amplifier channel ass suggested.
On a side note - I put some .FLAC files on a USB drive. That makes the whole thing sound a significant notch better. .FLAC are basically uncompressed audio files.
With that said - how connecting to the main wires change the connections @netsinah listed in his post, as he was calling out the tweeter wires and corresponding polarities.I only use 4 wires. I tap into the main (midrange).
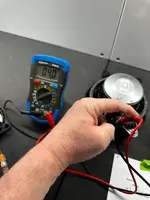
Hope this offers some helpful advice…So I spent several hours searching around forum posts with suggestions for polarities before installing my after market speakers and amps. I found testing each speaker individually was the best choice because not every post is accurate. Especially with the “driver side /passenger side” dilemma for European vs US models. From what I remember, all my purples were positives. I’m also pretty sure the sub harness is four positive wires with the negative wires mounted on the other side of the 6x9. That being said, I tested each set of wires prior to hooking up the new speakers with a 9 volt battery, (yes I’m ghetto). That gave me peace of mind that everything was hooked up properly. So far I tapped into door speakers wiring for additional A pillar tweeters, replaced the rear speakers with a coaxial set and bullet tweeters, replaced 6x9 “sub” with 12” sub in a sealed box. The sub and rear speakers are powered with 2 amps (mono and 4 channel) with the signal coming from LC2i tapped into sub wiring and door speakers wiring. The doors and A pillar tweeters are still on the factory amp (might have to run them to aftermarket amp to keep up). As for now it sounds 1 MILLION times better and didn’t break the bank.You need to be careful when using this thread to install new Alpine tweeters. First off, any reference to "left/right" in the thread, is from the perspective of a left-hand drive vehicle, so left is the "driver side" and right is the "passenger side". As well, this thread refers to the "upgraded" KEF audio system, found standard in the "First Edition Emira". Two Forum members both used speaker wiring that originates from the interior door speaker, which has both a midrange and a tweeter in it. I understand that Chriscpm refers to the midrange as the "main speaker", separately from its tweeter portion. That said, each Forum member hooked up the wiring differently:
1. Chriscpm (the OP or person who started this thread) method: he hooked up the new tweeters, to both the door midrange/aka "main speaker" (2 wires: colored blue and purple/white, for the right side, and purple/brown and blue/yellow, for the left side) and the door tweeter speaker (2 wires: colored yellow and purple/green for the right side, and blue and purple for the left side). So he taps into 4 wires on each side (8 in total) and doesn't mention polarity: see his past post #30 on this thread.
2. Crestima method: he hooked up the new tweeters, to only the door tweeter wiring, or at least that's all he mentioned. So 2 wires being yellow/white stripe and purple/green stripe, for the right side, and purple and blue/white stripe, for the left side. He taps into only 2 wires on each side (4 in total). He doesn't mention the polarity of all those wires. Check out his past posts #50 and #51, on this thread.
Anyone doing this tweeter addition, will have to decide which method they follow. I chose the Crestima method and when doing so, figured out the polarity, for the same wiring Crestima tapped into:
-right/passenger side:
---OEM yellow/white stripe = POSITIVE
---OEM purple/green stripe = NEGATIVE
-left/driver side:
---OEM blue/white stripe = POSITIVE
---OEM purple = NEGATIVE
Since I didn't use Chriscpm's method, I can't comment on the polarity of the other 4 wires, he tapped into (sorry).
At least this is my interpretation of this thread and I invite Chriscpm and Crestima, to correct me, if wrong. Both my new Alpine tweeters seem to be working AOK, after having tapped into 4 wires (not 8, like Chriscpm).
FWIW: the KEF "upgraded" audio system has in the rear side panels of the car:
-subwoofer on lower right/passenger side (at very bottom)
-midrange (?; I assume) speaker on same right/passenger side (about half way up)
-midrange (?; I assume) speaker on left/driver side (about half way up)
With the 2 door speakers, that's it for OEM speakers, in the First Edition (5 in total). There's another Forum thread, to install a new subwoofer and many who did it (me included) installed a Kicker 10" subwoofer...with some disconnecting the OEM subwoofer and others (like me) leaving it connected, with the new Kicker. BTW: what a difference the Kicker makes!!
I mention the above about the new tweeters, since I think some of Medic518's wiring ID above, is incorrect and I invite him to consider this post and look back at the posts done by Chriscpm and Crestima, that I've referenced above. Perhaps the mix-up is because the 2 methods of new tweeter installation on this thread, weren't recognized or because they confused things (?) and the polarity not always ID'd by both Chriscpm and Crestima (?). Hope this helps and doesn't further muddy the water. My apologies in advance, if I misinterpreted something...
- Thread starter
- #79
I just pointed someone from facebook to this post.
Just a quick summary, I did NOT use the supplied filter that shipped with the Alpines. I tried the filter on the first side. There was not much volume. Basically a failure. On the second side I "forgot" the filter. It has a lot more volume and sounded great. So I changed the second side.
I think tapping the mids is the way to go. Based on how other systems and speakers work.
I would have expected the Alpines to get crushed and blow up without the filter. But they don't. That is the unexpected surprise!
I slipped in the tweeters without taking the a pillar apart. It is possible, but took some nuance.
Just finished adding Hertz tweeters, but broke one of those pesky A-piller fasteners that are so hard to get off! Does anyone have the part number for that clip? I need to buy another. The fasteners are easy to break and actually are only a one time fastener, as it gets stretched out or breaks when you remove it!
Emira Forum Images


Emira Forum Images
Similar threads
- Replies
- 26
- Views
- 1K
- Replies
- 3
- Views
- 1K

