You can probably ask Boomgear to show you when you come visit. They are able to take it out very quickly if you know how.Damn, I was thinking about tackling this install myself when I get back to the states, maybe i still will since removing the downpipe seems to provide better access to some of the exhaust specific clamps.
Navigation
Install the app
How to install the app on iOS
Follow along with the video below to see how to install our site as a web app on your home screen.
Note: This feature may not be available in some browsers.
More options
Style variation
You are using an out of date browser. It may not display this or other websites correctly.
You should upgrade or use an alternative browser.
You should upgrade or use an alternative browser.
Exhaust System Upgrade Options Available for Turbo I4 AMG Engine Yet?
- Thread starter MB-SC-LTSE
- Start date
Totally agree, in real life the difference is day and night but its hard to capture the sound without proper equipment.That should definitely increase volume. The downpipe is a major bottleneck.
It’s just a page in the Lotus diagnostic software. They go to the page in the Lotus software, select the exhaust valve calibration and press go. The valve goes to full open, full closed and the car learns the new open/closed positions of the valve. That’s it, very simple with the correct software.
I believe the Milltek Exhaust valve controller avoids throwing codes.
I have a V1 Ti Aerie I4 exhaust. The valve arrangement is actually designed to match the OEM Valve’s open/closed positioning, but it still threw codes. Only the recalibration resolved it, no problem since. I also have their sports cat.
The V2 titanium exhaust system for the i4 and V6 has addressed the valve issues with a newly designed valve.
Quick update, my dealer ran the calibration while it was in for an oil change and all good (no more engine lights). He said basically the tolerances on the exhaust flap module are really tight. So, he's not surprised that it needed a calibration. He's done several apparently. Also, a few software updates.
Lastly, I went to a dealer that was about 80 miles away. So, after about another 160 miles of touring mode to burn in the exhaust packing, it sounds a bit "growlier" (is that a word???). I suspect like other exhausts, it'll be fully burned in after 300-500 miles. A big thanks to @Aerie for putting out a quality product. The tech said he hadn't seen the i4 version of any of the after-market exhausts (he's done a few v6's) and thought the titanium heat patina that was forming looked cool.
Lastly, I went to a dealer that was about 80 miles away. So, after about another 160 miles of touring mode to burn in the exhaust packing, it sounds a bit "growlier" (is that a word???). I suspect like other exhausts, it'll be fully burned in after 300-500 miles. A big thanks to @Aerie for putting out a quality product. The tech said he hadn't seen the i4 version of any of the after-market exhausts (he's done a few v6's) and thought the titanium heat patina that was forming looked cool.
I felt compelled to give an update on this for any other i4 exhaust DIY'ers. As you saw from above, my buddy and I really struggled getting clean access to the V clamp for proper placement and tightening when we did this over a month ago. The details are above.Ok, besides having to now have the valve calibrated that @lynchy73 and others have mentioned, it’s important to note that doing this on quickjacks, is a pain. I would say if you have access to a lift, use it!
First obstacle, the OE i4 exhaust is big and has an additional mounting bracket dead center. See pic…View attachment 63324
Next problem, the OE decat pipe (no third cat on i4) has a spot weld that unfortunately goes through the pipe making it essentially un-removeable. See pic…
View attachment 63325
Now next problem, because we couldn’t remove the decat, we couldn't squeeze the exhaust out. So after an hour of twisting and turning, I made the call. Reciprocating saw! See pic…
View attachment 63326
After that, getting it out was a cinch! Oh yeah, I skipped one other big headache, the V band clamp around the down pipe and decat. Getting that off was super hard because of the placement of the bolt. I don’t know how many extensions, elbows, etc. we used, but we finally broke it loose.
All in all, it was cool we did it, but it was a pain. BTW, you if you watch the cool install video on one of the other threads for the GRP titanium v6 exhaust install, it seems straight forward. However just know that the i4 is at another level of complexity if you don’t have a lift, the V band clamp on the down pipe to decat connection access, the spot weld that went too far on the decat preventing its removal, and finally the center bracket that got in the way of removal because the OE box is so big.
Lastly, as a reminder I got the v2 and it is beautiful(see pics earlier in this thread), even more so after a little blood (knuckles were busted), sweat and ok maybe one tear of joy when done!
Fast forward to last weekend and almost 600 miles later, I blew the mid-pipe that connects to the down pipe off under full throttle on the track (Buttonwillow's "The Circuit") at the end of one session.
To be clear, this was "TOTAL USER ERROR" at install. In the photo below (see red outline of the original clamp mark at an angle and not cleanly going evenly all the way around), you'll see that because we struggled to even get to it from under the car with the diffuser off, we clearly didn't fully seat the mid-pipe onto the downpipe, before torquing down the clamp.
End result of the blow-out was this:
For anyone wondering of course Lotus has no diffusers in NA (They said it would be over a month's wait). So, @GRP to the rescue with a raw carbon diffuser (thanks again Greg for the super prompt service and shipping!):
It really is a raw carbon piece. So, I spent another few bucks (and hours in labor) on high-temp radiant heat matting and metallic tape to heat protect this beautiful piece and transfer over the support bar and aluminum cooling vent for the valve controller:
In the end, this could have been a thousand times worse. So, I'm considering myself a bit lucky on this one (just more labor, clean-up and a diffuser). I'll close with the following tip again only for i4 owners given the v6 install is a cake walk compared to the turbo.
For the i4, I would recommend you also remove the lower engine bay cover in addition to the diffuser. This gives you much cleaner access to the "dreaded V clamp." Also, on the new mid-pipe, make sure you place dash marks about 8-10mm from the edge of the lip all the way around with a sharpie. This will serve as a visual point of reference when you are under the car and slipping the V clamp over the mounting lip to ensure it's evenly clamping all the way around and not tilted (I did this the second time when I re-mounted it to ensure this SHIT doesn't happen again!).
Lastly, if you look at the pic with the red outline, you'll see the thin edge that blew, was in fact covered by maybe 1mm of the v clamp. The fact that this held for roughly 600 miles before blowing off was crazy in itself. Like everyone else, we test drove the car right after the original install and that's why we didn't catch this as all seemed fine (except for the needed calibration). In any case, my choke, will hopefully prevent anyone else from making a similar mistake.
In the end, I'll chalk this one up to a learning experience and I got a cool CF diffuser out of it.
Last edited:
New exhaust system from Milltek, Supersprint, Jubu and Komo-tec:

 milltekexhaustshop.com

 www.supersprint.com
Video:

 www.jubu-performance.com
Video:
 www.komo-tec.com
Milltek Particulate Filter-back Exhaust Lotus Emira 2.0T (AMG Engine) 2023 and Later
Milltek Particulate Filter-back Exhaust Lotus Emira 2.0T (AMG Engine) 2023 and Later Our range of exhaust systems are perfectly suited to cater for anyone looking to improve their sound and aesthetics, designed as a direct replacement for the original system, available in multiple configurations...
milltekexhaustshop.com
LOTUS EMIRA 2.0i Turbo (366 Hp) 2023 ->
Sports exhaust for LOTUS EMIRA 2.0i Turbo
Video:
JUBU Performance -
Tuning und Porsche/Lotus Service in Österreich, Inspektion und Unfallreparatur für Lotus und Porsche. Vertrieb von Porsche und Lotus Performance Parts.
www.jubu-performance.com
Video:
Emira I4 AMG Sports Rear Silencer | 6201-002
Emira I4 AMG Sports Rear Silencer Stainless steel sports rear silencer for your Lotus Emira I4 2.0L Turbo. Top quality and perfect fit. Deep, sporty sound. Includes valve control (converted from the OEM part), flex section, and heat shielding for the rea…
www.komo-tec.com
Last edited:
Agree, the downpipe is so obscenely large that the catalyst filament is really sucking up a lot of the natural noise. Frankly, all we need is an exhaust option that can still leverage the OE valve controller motor, but just flips between a larger than OE non-resonated pipe (for the closed valve flow) and an even larger one (for the open valve flow) to allow 100% of any noise left post OE downpipe to come through.Seems to me we need one with no mufflers
I will say, that if you swap out to a high-flow cat downpipe, you will get more volume, but even then it's not at a level most would find obnoxious (not even close).
That would work too.How about just gutting the muffler
In the process of having a custom exhaust guy local to me fabricate me a 3” SS y-pipe from DP flange to tips with no mufflers or resonators.
We will just leave the valve mechanism connected and mounted up in the rear bumper somewhere to satisfy the ECU/CANBUS signal.
We discussed SS vs Ti. Because I am after a lower aggressive growl and also this y-pipe is an experiment and to save on Ti costs, he recommended SS. So we’ll see.")
We will just leave the valve mechanism connected and mounted up in the rear bumper somewhere to satisfy the ECU/CANBUS signal.
We discussed SS vs Ti. Because I am after a lower aggressive growl and also this y-pipe is an experiment and to save on Ti costs, he recommended SS. So we’ll see.
He is a guy that works at a race shop who does custom exhaust on the side out of his little shop. I joked with him about potentially mass producing but he seemed indifferent to the idea. Maybe when he gets done….Will they be selling it possibly?
Would you happen to have any videos that show how the car sounds with this exhaust installed?
Whether having no exhaust valve triggers error codes, check engine lights, or other ECU warnings?
This is what i sent to my exhaust guy for reference. I dont know what his exact plans are but it will be along the lines of this.
The Milltek valve controller connects to the stock valve mechanism. You can switch valve open or close with remote control. Our plans is to just keep Milltek connected and mount the valve unit up in the bumper somewhere. The car should still think that the valve controller unit is still connected to the exhaust so shouldnt have errors.
Any ProgressThis is what i sent to my exhaust guy for reference. I dont know what his exact plans are but it will be along the lines of this.
The Milltek valve controller connects to the stock valve mechanism. You can switch valve open or close with remote control. Our plans is to just keep Milltek connected and mount the valve unit up in the bumper somewhere. The car should still think that the valve controller unit is still connected to the exhaust so shouldnt have errors.
View attachment 67514
All,
Redstar Exhaust had a link to an i4 Emira specific pipe, but had been recently been removed due to lack of interest. You can still order it through the Mercedes m139 link with a note saying it is for an Emira.
I have ordered the catless version with the heat shielding. Once it arrives I plan to put together some pictures of the pipe and the install process.
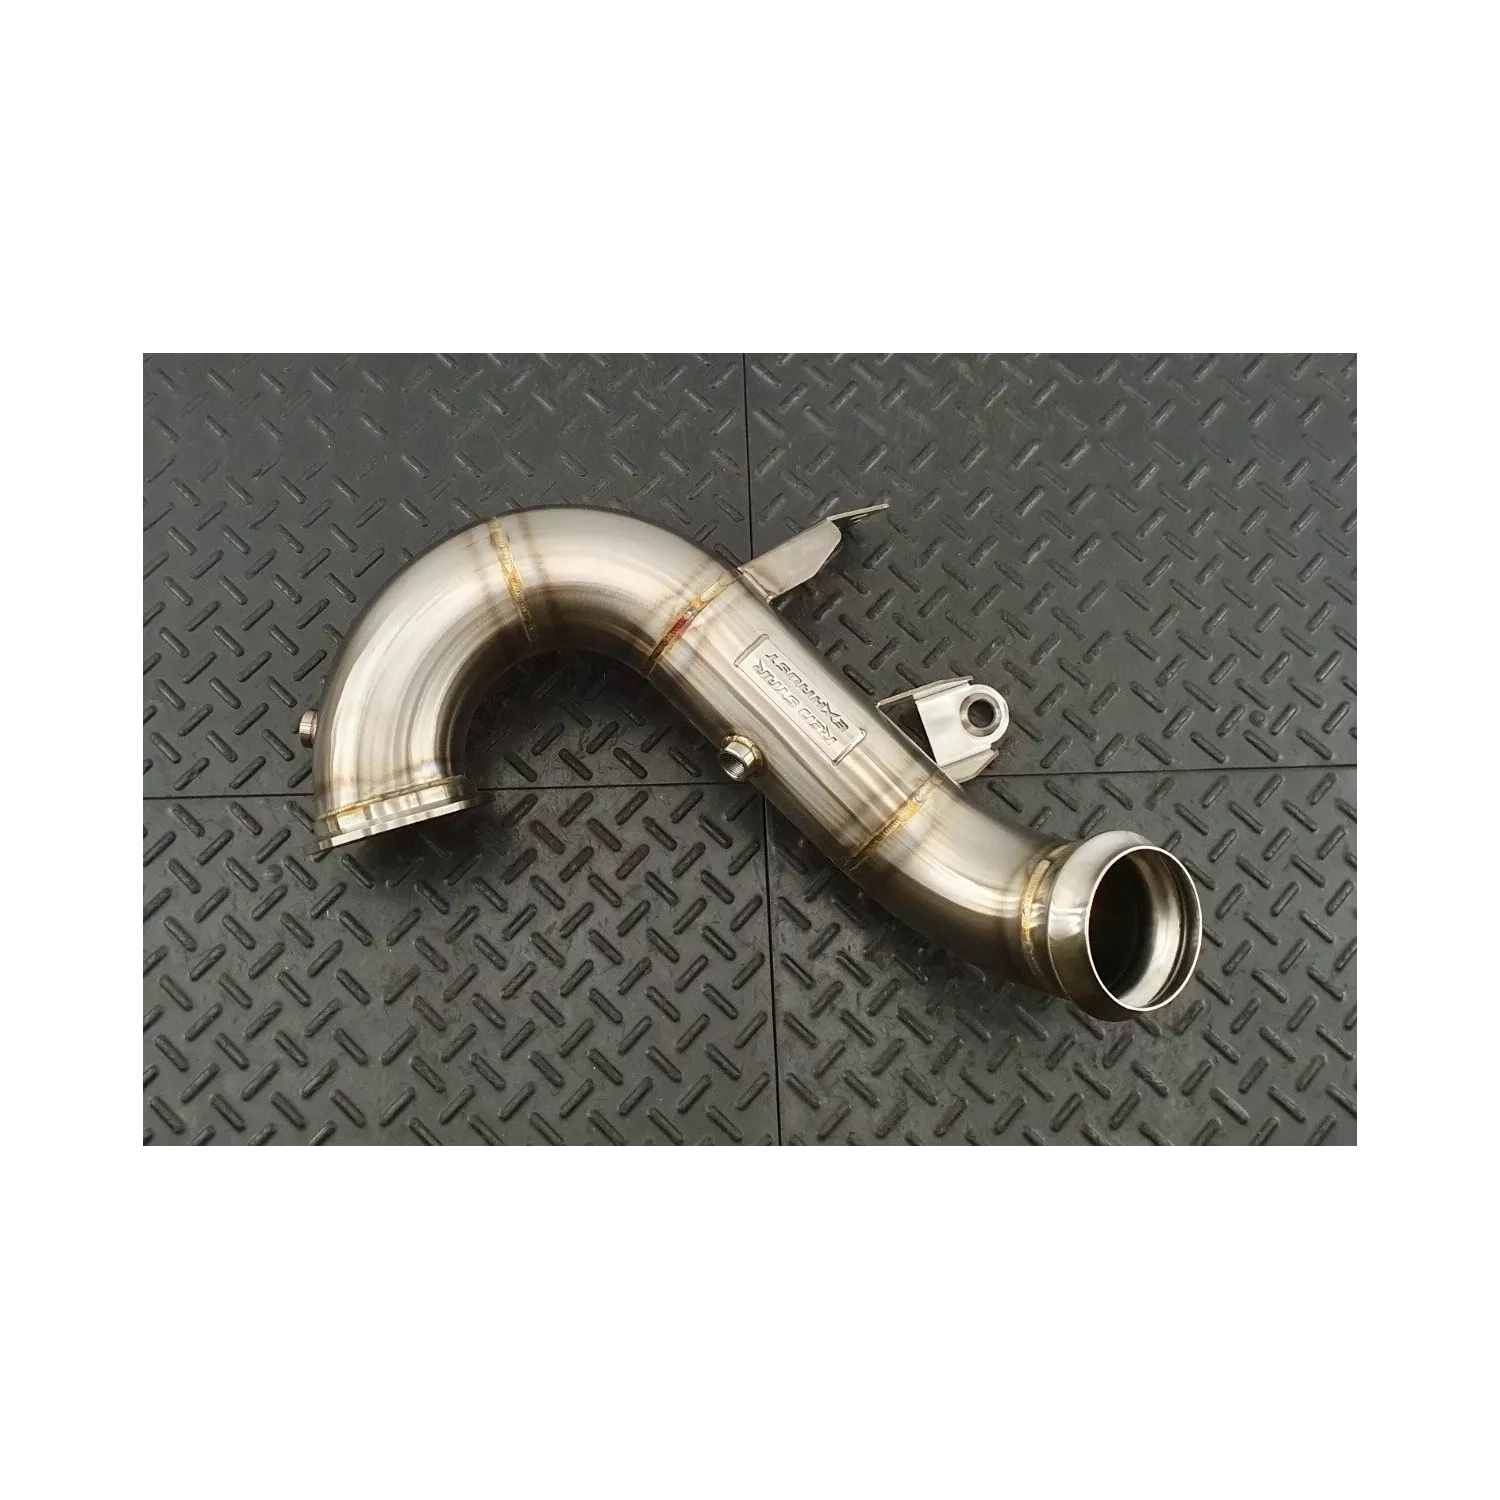
 redstarexhaustusa.com
Redstar Exhaust had a link to an i4 Emira specific pipe, but had been recently been removed due to lack of interest. You can still order it through the Mercedes m139 link with a note saying it is for an Emira.
I have ordered the catless version with the heat shielding. Once it arrives I plan to put together some pictures of the pipe and the install process.
Redstar Mercedes A45|CLA45|GLA45 M139 Downpipe
REDSTAR EXHAUST M139 Downpipes are the must-have mod for your AMG 45 2.0L Turbo engine. These engines have a huge potential that can be realized with a Downpipe and Tune. Fits all new 2020+ A45/A45S, CLA45/CLA45S and GLA45/GLA45S. *VIN required in the notes section when ordering, so we can make...
redstarexhaustusa.com
Emira Forum Images


Emira Forum Images
Similar threads
- Replies
- 101
- Views
- 7K
- Replies
- 142
- Views
- 17K
- Replies
- 6
- Views
- 519

