Follow along with the video below to see how to install our site as a web app on your home screen.
Note: This feature may not be available in some browsers.
I thought about that but I'm a KISS kinda guy and the glue was a sure way to make a solid seal with no added complexity. Additionally, it doesn't have to look pretty necessarily, it just needs to work. I worried that if I tried something fancy there would be more opportunities for failure. The biggest area I wasn't confident in a gasket/o-ring of some sort is the wire exit. This was the primary area that drove me toward a sealant - so that it would conform around the wire and make a fillet of sorts to the box.Good ideas in this thread. I’ve already designed a replacement case for someone about a year ago, I should adapt it with a groove for a printable tpu gasket and grommet for the wiring harness.
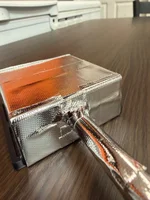
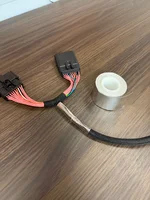
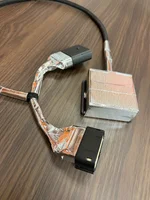
Nice! Great idea's, thanks for sharing!This is probably overkill, but considering I purchased a titanium exhaust, which has caused problems for people due to heat, and I really didn't want to hassle with repurchases or reinstallations, I did the following:
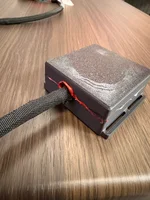
1) I used Permatex "The Right Stuff" Red around the electrical component where the wire comes out of the Milltek Controller. This stuff was a little difficult and messy to deal with and requires some care.
2) I used the E6000 which was included with the enclosure to seal the rest of the enclosure because it's much easier to apply.
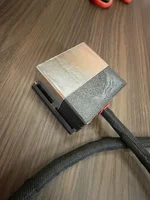
3) Then I used high temperature wire loom over the wires.
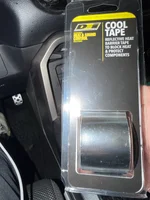
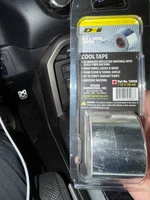
4) Finally, used Design Engineering Cool Tape (claims protection up to 2000 degrees F).
Here are some pics. I'll let you know when it explodes....
I haven't really considered it due to the cost/benefit. Although I don't know what the cost would actually be.Do you ship to the UK?
Not at the moment but you may be able to drill and install one on the box. The tolerances are such that it’s a pretty exact fit though. I’m not sure how air tight these installations are. Call it IP67-ishDo any of these incorporate a breather valve? If you make them too air tight and don’t nitrogen purge the air out, you’re basically trapping humidity in the box. With temp cycling it will condense and evaporate, causing corrosion of the electronics over time.
Great idea and design, have you been able to confirm if this works with the Version 2? If it does, feel free to send me a direct message and I will order one upHello fellow enthusiasts! I'd like to show you a solution I've created to help keep the Milltek valve controller unit and connector out of the elements.
When I bought my valve controller and saw it was recommended to install the unit using a plastic bag to keep it dry, I wanted a more elegant solution. I designed and printed this enclosure for my own installation, showed the Houston Emira Group, and it became pretty popular. ...So I thought I'd offer it here as well!
View attachment 71517
There are two versions available, both include a .18oz tube of E6000 Premium which is designed for plastic such as ASA. Both of my enclosures are compatible with V1 and V2 versions of the Milltek controller. Choices outlined below:
- Without Tabs - Plain square box with no zip tie tabs. (This style is best if you have a V1 controller AND want to mount it in the cubby on the rear bumper)
- With Tabs - Square box with zip tie tabs for easier and safer mounting. Zip ties should still be installed over the box but the tabs help keep the box from slipping out of the zip tie.
The enclosure is made with ASA plastic and comes in two halves. Installation is as follows:
Price - $35 shipped CONUS
- Insert the controller into the bottom half.
- Attach the top using the included E6000 Premium adhesive and clamp/weight it to dry.
- Once the halves are joined together you should smear some of the adhesive along the seam around the box to ensure weather resistance.
- For the cable exit, use adhesive to seal this area.
- Wait for the adhesive to dry, 24hr recommended. And install on the car!
I take Venmo or Zelle. PM me with any questions, which enclosure you'd like, and your address and I'll supply payment info.
(Contact me for other locations)
BOX WITHOUT TABS
View attachment 71162View attachment 71163View attachment 71164
BOX WITH TABS
View attachment 71165View attachment 71518View attachment 71519View attachment 71516
INSTALLATION EXAMPLE
View attachment 71166View attachment 71167
Thank you! I'll answer this here to close the loop for future folks. This is compatible with V1 and V2 Milltek units. My box without tabs is best for the V1 Milltek because it fits in the cubby hole in the rear bumper whereas the V2 Milltek is best zip tied to the frame so the box with tabs is better.Great idea and design, have you been able to confirm if this works with the Version 2? If it does, feel free to send me a direct message and I will order one up![]()
I installed my V2 into the “cubby hole” in the right side of the rear bumper (as opposed to the left for V1), so you can technically use your box without tabs for the V2 as well. I found it to be more secure here.Thank you! I'll answer this here to close the loop for future folks. This is compatible with V1 and V2 Milltek units. My box without tabs is best for the V1 Milltek because it fits in the cubby hole in the rear bumper whereas the V2 Milltek is best zip tied to the frame so the box with tabs is better.
Therefore, if you have the V2 Milltek I recommend my box WITH tabs.
Yes, exactly. My enclosure is universal for both Milltek controllers. It's really down to your installation location preference. Good feedback, thanks!I installed my V2 into the “cubby hole” in the right side of the rear bumper (as opposed to the left for V1), so you can technically use your box without tabs for the V2 as well. I found it to be more secure here.
Or. You could seal it in the box with a Silica packet to absorb moistureNot at the moment but you may be able to drill and install one on the box. The tolerances are such that it’s a pretty exact fit though. I’m not sure how air tight these installations are. Call it IP67-ish![]()