Coming from the Abarth world a decade ago as a hobby build car, the GFB BOV was a great modification. In the Alfa 4C, there were no options for an atmospheric BOV. Called up my drug dealer Greg@GRP and asked if there were any BOV options for the M139. He suggested the GFB BOV… install is literally 10 minute swap (UNLESS you drop one of the bolts in the engine bay and have to jack of the car and remove the rear diffuser…ask me how i know! LOL)
I also have the Burger Motorsports (BMS) BOV plate and if youve been watching BMS JB4 youtube video, you do hear them mention the install of their BOV plate.
The concern(s) of an atmospheric BOV on our M139 i4, although theoretical and not yet proven, is that the OEM tune as well as the engine configuration might not like richer AFRs and is too sensitive to boost/gas variations with it being atmospheric and will probably throw some CELs or affect performance. I guess we’ll see.
For those who are not familiar with the Pros and Cons with an atmospheric BOV, here is chatgpt:
Atmospheric Blow-Off Valve (BOV)
Pros:
Install was easy.
1. Disconnect harness plug on OEM BOV.
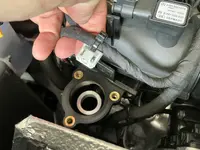
2. Remove 3 bolts
3. Dislodge wire bundle mounting clip near BOV, you will need more clearance space to mount the GFB BOV. Just use a little flat screwdriver. See picture.
4. Orient the GFB BOV so bolt holes line up. There is only one orientation that will work and its easy to figure it out.
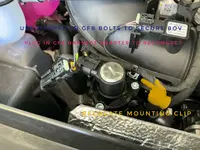
5. Use the 3 GFB supplied bolts to mount BOV.
6. Plug in supplied GFB wire harness adapter to reconnect BOV harness.
7. Relocate dislodged wire bundle mounting clip.
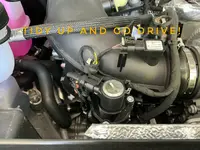
Done!
After a short 10 mile test drive, boost seems better while pushing. Sound is great. No CEL
 . Driving another 100 miles today to C&C and running around so will report back.

I also have the Burger Motorsports (BMS) BOV plate and if youve been watching BMS JB4 youtube video, you do hear them mention the install of their BOV plate.
The concern(s) of an atmospheric BOV on our M139 i4, although theoretical and not yet proven, is that the OEM tune as well as the engine configuration might not like richer AFRs and is too sensitive to boost/gas variations with it being atmospheric and will probably throw some CELs or affect performance. I guess we’ll see.
For those who are not familiar with the Pros and Cons with an atmospheric BOV, here is chatgpt:
Atmospheric Blow-Off Valve (BOV)
Pros:
- Sound Appeal:
- Creates a distinctive “whoosh” sound when releasing pressure, popular among car enthusiasts.
- Reduces Compressor Surge:
- Helps prevent back pressure on the turbocharger when lifting off the throttle, extending turbo life.
- Simple Venting Mechanism:
- Vents excess boost pressure directly to the atmosphere, reducing complexity in some setups.
- Improved Throttle Response (in some cases):
- Reduces lag by quickly releasing pressure, allowing faster spool-up.
- Rich Fuel Conditions (in MAF-based systems):
- Venting to the atmosphere can confuse Mass Air Flow (MAF) sensors, leading to rich air-fuel mixtures and stalling.
- Potential Emissions Issues:
- Not always emissions-compliant; may cause issues in regions with strict regulations.
- Noise Complaints:
- The loud “pssh” noise may be unwanted in residential or quiet areas.
- Not Ideal for All ECU Setups:
- Cars not tuned for atmospheric BOVs might run poorly unless properly calibrated.
Install was easy.
1. Disconnect harness plug on OEM BOV.
2. Remove 3 bolts
3. Dislodge wire bundle mounting clip near BOV, you will need more clearance space to mount the GFB BOV. Just use a little flat screwdriver. See picture.
4. Orient the GFB BOV so bolt holes line up. There is only one orientation that will work and its easy to figure it out.
5. Use the 3 GFB supplied bolts to mount BOV.
6. Plug in supplied GFB wire harness adapter to reconnect BOV harness.
7. Relocate dislodged wire bundle mounting clip.
Done!
After a short 10 mile test drive, boost seems better while pushing. Sound is great. No CEL
. Driving another 100 miles today to C&C and running around so will report back.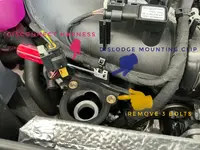

 you can even hear the sound with the engine cover on, with the windows up and even through my sound deadening on the firewall..


