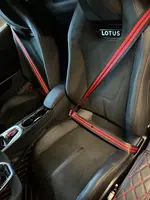
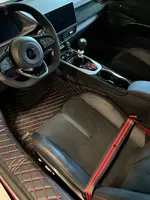
Just finishing up part of the DIY mods for my '24 V6, including cutting up/discarding perfectly good "slightly used" black OEM seatbelt webbing. For those of you interested in taking this on, here are some pointers:
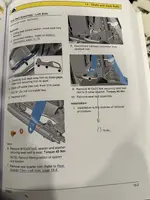
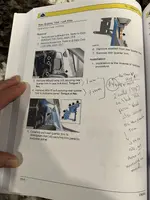
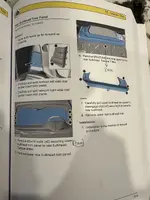
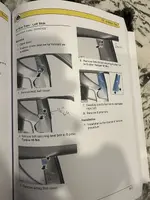
1. You need to disconnect the seatbelt from its top tethering point. Then you need to remove the rear panels (each side), to access the seatbelt retractor mechanism. Start with page 13-3 of the shop manual, for directions. I'll post a copy on this thread, when I have access to my manual at home. I also disconnected the battery negative terminal, "just in case" and as usual (for me) placed a wad of non-conductive material, between the negative battery post and the round battery cable, to ensure no contact.
2. Next, remove the lower casing on the side of each seat (closest to the door), to access the bolt that connects the seatbelt to the seat (each side). Photos below show the inside of the casing, to better illustrate how it connects to the seat. There are 3 lower clips. It's not hard to get off: just slowly pry it away from different edges and it'll pop off, one clip at a time.
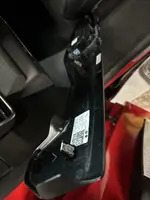
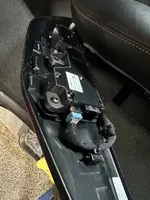
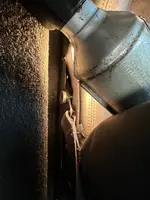
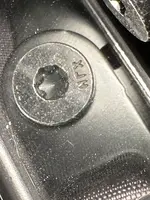
3. Now you'll see the connecting bolt (see photo below) which is in a narrow gap, between the seat edge and the carpeted door sill. There's not a lot of room to work in that space. I was told by a mechanic friend, that car manufacturers often use "loctite" on the threads, to better secure a seatbelt bolt in case of an accident impact, which can make them ++ difficult to remove. He suggested it would be easier to remove the seat, to get to that bolt and disconnect the seatbelt from the seat. You may wish to do that. Instead of removing the seat(s) and through trial and error (trying different tools), I found out:
a) the bolt head is a T50 (torx) (see photo below, taken with the help of a mirror);
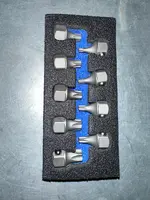
b) perhaps you can get a small 1/4" ratchet in the gap, fitted with a T50 bit, however I found a "stubby T50 bit" with a hexagonal base (to fit a 12mm wrench head) worked. See photo below for the set of stubby torx bits, including the T50 size. You'll find this torx set on Amazon. There are only 2 of these type of sets I found for sale, so it's not very common (search "stubby torx bits" and keep scrolling until you find one);
c) there was no loctite, so the bolt was easily unthreaded, once you had a T50 in it, plus something to turn the T50 bit;
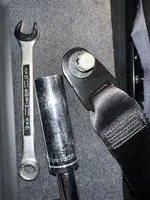
d) was able to unscrew it, using the 12mm wrench on the hex end of the bit. To get it to move in the beginning and get more "torque", I put a 19mm deep socket, on the end of the 12mm wrench (see photo) for better leverage. I often put a finger on the end of the T50 while turning it with the 12mm, to ensure it remained in place and didn't fall out.
4. Next, consider searching YouTube, for DIY videos on seatbelt removal and webbing replacement. There are several good ones, but none that I found for a Lotus. They are still helpful, since the same principals apply.
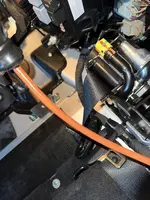
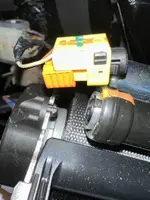
5. One such video showed the different kind of electrical connectors, for the seatbelt retractor mechanism, including something similar to the one in the Emira. The main point of the video, is NOT to try to disconnect it, by pulling on the wired end. Doing so, could pull out a wire or put the inside pins out of alignment, causing a malfunction and/or throwing a code. Take a small/thin flat head screwdriver and wedge it between the 2 sides of the connector, to pop the one side back and away from the rest. Then you can easily pull it apart and off. The first photo below, shows the OEM set-up with the connector in place (untouched). The next photo, shows the lower orange part of the connector wedged out, allowing the removal of the connector from its round base.
6. Remove the one bolt that connects the seatbelt retractor assembly to the vehicle. You'll find a little "L-shaped" guide, on the assembly that matches a slot on the plate on the car, which has the bolt hole. Once you get the bolt out, you move the assembly sideways so it comes out of that "guide", in order to take it out. That same "guide" also makes it easier to line up the bolt hole/bolt, when putting everything back together.
6. Now the fun begins. Remove the entire seatbelt assembly: the "seat bolt end" and the retractor assembly, as one unit.
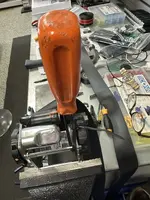
7. Next, unwind the OEM webbing. You can only do this, by keeping the retractor assembly in an upright/balanced position. If it senses it's out of alignment, it'll lock the webbing in place. I found putting it into a bench vise, the easiest way to keep it level and work on it (see photo below). But you don't need a vise; it'll work if you position the retractor assembly, correctly.
8. BEWARE: once most of the OEM webbing is out, the end of it will be connected to the inner metal "spool". With the webbing mostly out but still connected to that spool, the webbing is under tension and the spool will want to pull the webbing back in. YOU MUST BLOCK THE INNER SPOOL OF THE RETRACTOR MECHANISM, SO IT'S HELD IN PLACE AND DOESN'T MOVE, BEFORE REMOVING ALL OF THE OEM WEBBING FROM THE SPOOL. YOU DON'T WANT THE SPOOL TO UNWIND, W/O THE NEW WEBBING IN PLACE, SINCE I'M TOLD IT'S ++++ NEXT TO IMPOSSIBLE, TO GET THE EMPTY SPOOL TO UNWIND TO ITS END AGAIN. The DIY videos I looked at, usually showed a screwdriver jammed in the edge of the spool, to keep it in place. That didn't work 100% for me: I jammed a large screwdriver in, but still got movement. I then used an 8" zip-tie, tied around the screwdriver and retractor mechanism, to pull the screwdriver in tight towards the spool edge and better block movement and prevent the spool from winding up again (see photo below). Note: I suggest taking photos of the OEM set-up, before taking any steps, to ensure you know how it goes back together and you can use those photos as a guide. Anyway, make careful note of: (i) how the OEM web is threaded into the retractor mechanism; (ii) that there's a thin slot on the inner retractor metal spool, where the webbing first goes into; (iii) then from there, it threads into another but wider slot, where the OEM webbing ends, making its final connection to the metal inner retractor spool.
9. With the inner spool properly held in place (ie. screwdriver/zip-tie or whatever works for you), so it doesn't want to "wind back up", you can remove the last of the OEM webbing that's threaded into the spool. Find the wider end slot on the spool and slowly pull the OEM webbing up and out of that slot. You'll find there's a small white solid plastic "tube" that's inside the end of the OEM webbing, making that end of the webbing wider. That wider end fits nicely into the wider slot, securing the webbing to the metal inner spool. Once you pry that end out, you remove the white plastic piece, flatten out the end of the webbing, then pull the OEM webbing completely out of the inner retractor spool. I resisted cutting the OEM webbing to remove it...since that could make your future measurements less accurate (see below). Again, watch how the OEM webbing entered the spool and was attached...and how the OEM webbing was installed, in relation to the hardware attached to that OEM webbing. Pay attention to how the hardware is oriented on the old OEM webbing. Again, consider taking photos, to use later as guides. You're now ready to install the new webbing.
10. Carefully lay out the OEM webbing on the floor, complete with its OEM attached hardware (see photo below). Set the replacement webbing next to it, then cut the new webbing so it's the same length as OEM, giving extra length on the replacement webbing, for areas on the OEM webbing, that are folded/stitched.
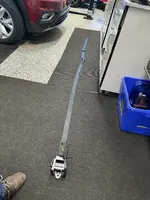
Once you have the proper length of replacement webbing:
a) make note of (mark on the new webbing, as necessary) where things sit on the OEM webbing and their orientation. You use the old OEM webbing as your guide, so you recreate identically, to match how the original OEM hardware, connects to the new webbing. There's the one folded end, which has the bolt that connects to the seat. You need to match that folded piece, on the replacement webbing...then match the stitching of the old OEM webbing, which connects the new webbing to the bolt end. Then above that end, is the small circular "stop" (or plastic "button") which prevents the seatbelt from movement. You need to apply the replacement "stop" in the same spot. Then above that, is the hardware (belt buckle and bolt that attaches the upper end of the seatbelt assembly, to the car). Watch how it's set up, so you can recreate that with the replacement webbing (sorry to keep repeating this...but it's much easier if you know how to recreate the original set-up). Then at the other end, you have to match the fold and small gap, where the white plastic piece fits in...plus match the stitching at that end.
b) when you're ready, cut the old OEM webbing, to remove its hardware.
c) find someone with some sewing skills. I used a local tailor who used "#80" thread (thicker thread used on blue jean material), to sew both ends. The stitching must go ++ back/forth, so it's strong enough to withstand an accident impact and keep the seatbelt in place. Because of a YouTube video I watched, for the first seatbelt I did, I folded the ends, then glued them together to prepare them for sewing. My tailor wasn't happy with the glue, said it was unnecessary, added some thickness and made it more difficult to sew. I therefore didn't glue the second belt and everything worked better for the tailor. One YouTube video I watched, had the person replacing the webbing, doing his own sewing by hand. I don't think that a good idea, both due to the increased time involved, but more importantly, the end strength of the stitching pattern. You choose.
d) once both ends are properly sewed, flatten the end that goes back into the inner spool of the retractor, carefully thread it in (the correct placement), until it comes out the wider slot and you've got sufficient length to work with. Then insert the plastic piece in the end gap, and pull it back out so it fits snugly into the wider spool slot, ensuring it's level to the surface of the metal spool. You're now ready to wind the new replacement webbing onto the spool. Remove the screwdriver/zip-tie (or whatever you've used) and slowly allow the spool to rotate and wind up the new webbing. Sewing both ends before re-installation, is what I saw on one YouTube video, which is why I followed that method, to start.
OR (IMO and better yet) consider doing what I did for the second seatbelt. Instead of sewing both ends and then installing the new webbing onto the retractor mechanism, I took the entire seatbelt assembly to the tailor. He sewed the one end with the seat bolt...and THEN we threaded the other end into the retractor spool, before sewing that end. That way, that end of the new seatbelt was completely flat (it wasn't sewed and double-layered) and went into the inner retractor spool, MUCH easier. Once it's in, pull out a sufficient length, so the tailor can then sew that end. Then insert the white plastic piece into that end, and then pull the new webbing back, until that thicker end fits snugly/level into the metal inner spool wider gap (as above).
e) the rest is the reverse, putting everything back together. The hardest part for me, was putting the new webbing correctly onto the inner retractor spool. Please do look at some YouTube videos, to better show the process. If you're like me and this is your first time doing this, I don't recommend simply relying upon this thread, although I've made it fairly detailed. Sorry about my "made-up terminology" above. There's likely proper names for many of the components, that I've not used, but my explanation should still make sense.
FYI, I purchased my new webbing from "AliExpress" since I wanted something different than simply a solid color. They had a much better selection. See the second last photo above, which shows my replacement webbing (black/dual red stripes) ready to go, in the background. Mine came as one long roll, which I first cut in half...then cut again once measured against each OEM length. Mine also came with new "plastic black buttons" that snap onto the new seatbelt (one each side of the belt), although if you don't get them with your replacement webbing, they can be easily found and my tailor offered me several choices.
You can always remove the entire seatbelt assembly, then ship it to a business that replaces webbing, however I didn't find any of them with the type of replacement webbing I wanted: most only had solid colors. Some people may not trust the "made-in-China" webbing I purchased, but I'm satisfied it's OK and note that most seatbelt webbing used by car manufacturers, looks to come from China, anyway. It certainly looked to be the same quality webbing, as OEM. I wasn't able to get a local installer for this job. The ones I spoke with, said they'd only replace with OEM webbing...and all new OEM parts (ie. including the retractor mechanism, belt buckle, etc.); likely due to their liability concerns. None would install new webbing that I'd provide them nor use the original parts, leaving me no choice but to do this myself. Perhaps you'll have better luck finding someone in your area to do this for you, if like me, you're not happy with the selection offered by the "mail order replacement webbing businesses" and choose not to use one of them.
Sorry for the long read. Hope this helps and good luck!!
1. You need to disconnect the seatbelt from its top tethering point. Then you need to remove the rear panels (each side), to access the seatbelt retractor mechanism. Start with page 13-3 of the shop manual, for directions. I'll post a copy on this thread, when I have access to my manual at home. I also disconnected the battery negative terminal, "just in case" and as usual (for me) placed a wad of non-conductive material, between the negative battery post and the round battery cable, to ensure no contact.
2. Next, remove the lower casing on the side of each seat (closest to the door), to access the bolt that connects the seatbelt to the seat (each side). Photos below show the inside of the casing, to better illustrate how it connects to the seat. There are 3 lower clips. It's not hard to get off: just slowly pry it away from different edges and it'll pop off, one clip at a time.


3. Now you'll see the connecting bolt (see photo below) which is in a narrow gap, between the seat edge and the carpeted door sill. There's not a lot of room to work in that space. I was told by a mechanic friend, that car manufacturers often use "loctite" on the threads, to better secure a seatbelt bolt in case of an accident impact, which can make them ++ difficult to remove. He suggested it would be easier to remove the seat, to get to that bolt and disconnect the seatbelt from the seat. You may wish to do that. Instead of removing the seat(s) and through trial and error (trying different tools), I found out:
a) the bolt head is a T50 (torx) (see photo below, taken with the help of a mirror);
b) perhaps you can get a small 1/4" ratchet in the gap, fitted with a T50 bit, however I found a "stubby T50 bit" with a hexagonal base (to fit a 12mm wrench head) worked. See photo below for the set of stubby torx bits, including the T50 size. You'll find this torx set on Amazon. There are only 2 of these type of sets I found for sale, so it's not very common (search "stubby torx bits" and keep scrolling until you find one);
c) there was no loctite, so the bolt was easily unthreaded, once you had a T50 in it, plus something to turn the T50 bit;
d) was able to unscrew it, using the 12mm wrench on the hex end of the bit. To get it to move in the beginning and get more "torque", I put a 19mm deep socket, on the end of the 12mm wrench (see photo) for better leverage. I often put a finger on the end of the T50 while turning it with the 12mm, to ensure it remained in place and didn't fall out.


4. Next, consider searching YouTube, for DIY videos on seatbelt removal and webbing replacement. There are several good ones, but none that I found for a Lotus. They are still helpful, since the same principals apply.
5. One such video showed the different kind of electrical connectors, for the seatbelt retractor mechanism, including something similar to the one in the Emira. The main point of the video, is NOT to try to disconnect it, by pulling on the wired end. Doing so, could pull out a wire or put the inside pins out of alignment, causing a malfunction and/or throwing a code. Take a small/thin flat head screwdriver and wedge it between the 2 sides of the connector, to pop the one side back and away from the rest. Then you can easily pull it apart and off. The first photo below, shows the OEM set-up with the connector in place (untouched). The next photo, shows the lower orange part of the connector wedged out, allowing the removal of the connector from its round base.


6. Remove the one bolt that connects the seatbelt retractor assembly to the vehicle. You'll find a little "L-shaped" guide, on the assembly that matches a slot on the plate on the car, which has the bolt hole. Once you get the bolt out, you move the assembly sideways so it comes out of that "guide", in order to take it out. That same "guide" also makes it easier to line up the bolt hole/bolt, when putting everything back together.
6. Now the fun begins. Remove the entire seatbelt assembly: the "seat bolt end" and the retractor assembly, as one unit.
7. Next, unwind the OEM webbing. You can only do this, by keeping the retractor assembly in an upright/balanced position. If it senses it's out of alignment, it'll lock the webbing in place. I found putting it into a bench vise, the easiest way to keep it level and work on it (see photo below). But you don't need a vise; it'll work if you position the retractor assembly, correctly.
8. BEWARE: once most of the OEM webbing is out, the end of it will be connected to the inner metal "spool". With the webbing mostly out but still connected to that spool, the webbing is under tension and the spool will want to pull the webbing back in. YOU MUST BLOCK THE INNER SPOOL OF THE RETRACTOR MECHANISM, SO IT'S HELD IN PLACE AND DOESN'T MOVE, BEFORE REMOVING ALL OF THE OEM WEBBING FROM THE SPOOL. YOU DON'T WANT THE SPOOL TO UNWIND, W/O THE NEW WEBBING IN PLACE, SINCE I'M TOLD IT'S ++++ NEXT TO IMPOSSIBLE, TO GET THE EMPTY SPOOL TO UNWIND TO ITS END AGAIN. The DIY videos I looked at, usually showed a screwdriver jammed in the edge of the spool, to keep it in place. That didn't work 100% for me: I jammed a large screwdriver in, but still got movement. I then used an 8" zip-tie, tied around the screwdriver and retractor mechanism, to pull the screwdriver in tight towards the spool edge and better block movement and prevent the spool from winding up again (see photo below). Note: I suggest taking photos of the OEM set-up, before taking any steps, to ensure you know how it goes back together and you can use those photos as a guide. Anyway, make careful note of: (i) how the OEM web is threaded into the retractor mechanism; (ii) that there's a thin slot on the inner retractor metal spool, where the webbing first goes into; (iii) then from there, it threads into another but wider slot, where the OEM webbing ends, making its final connection to the metal inner retractor spool.

9. With the inner spool properly held in place (ie. screwdriver/zip-tie or whatever works for you), so it doesn't want to "wind back up", you can remove the last of the OEM webbing that's threaded into the spool. Find the wider end slot on the spool and slowly pull the OEM webbing up and out of that slot. You'll find there's a small white solid plastic "tube" that's inside the end of the OEM webbing, making that end of the webbing wider. That wider end fits nicely into the wider slot, securing the webbing to the metal inner spool. Once you pry that end out, you remove the white plastic piece, flatten out the end of the webbing, then pull the OEM webbing completely out of the inner retractor spool. I resisted cutting the OEM webbing to remove it...since that could make your future measurements less accurate (see below). Again, watch how the OEM webbing entered the spool and was attached...and how the OEM webbing was installed, in relation to the hardware attached to that OEM webbing. Pay attention to how the hardware is oriented on the old OEM webbing. Again, consider taking photos, to use later as guides. You're now ready to install the new webbing.
10. Carefully lay out the OEM webbing on the floor, complete with its OEM attached hardware (see photo below). Set the replacement webbing next to it, then cut the new webbing so it's the same length as OEM, giving extra length on the replacement webbing, for areas on the OEM webbing, that are folded/stitched.

Once you have the proper length of replacement webbing:
a) make note of (mark on the new webbing, as necessary) where things sit on the OEM webbing and their orientation. You use the old OEM webbing as your guide, so you recreate identically, to match how the original OEM hardware, connects to the new webbing. There's the one folded end, which has the bolt that connects to the seat. You need to match that folded piece, on the replacement webbing...then match the stitching of the old OEM webbing, which connects the new webbing to the bolt end. Then above that end, is the small circular "stop" (or plastic "button") which prevents the seatbelt from movement. You need to apply the replacement "stop" in the same spot. Then above that, is the hardware (belt buckle and bolt that attaches the upper end of the seatbelt assembly, to the car). Watch how it's set up, so you can recreate that with the replacement webbing (sorry to keep repeating this...but it's much easier if you know how to recreate the original set-up). Then at the other end, you have to match the fold and small gap, where the white plastic piece fits in...plus match the stitching at that end.
b) when you're ready, cut the old OEM webbing, to remove its hardware.
c) find someone with some sewing skills. I used a local tailor who used "#80" thread (thicker thread used on blue jean material), to sew both ends. The stitching must go ++ back/forth, so it's strong enough to withstand an accident impact and keep the seatbelt in place. Because of a YouTube video I watched, for the first seatbelt I did, I folded the ends, then glued them together to prepare them for sewing. My tailor wasn't happy with the glue, said it was unnecessary, added some thickness and made it more difficult to sew. I therefore didn't glue the second belt and everything worked better for the tailor. One YouTube video I watched, had the person replacing the webbing, doing his own sewing by hand. I don't think that a good idea, both due to the increased time involved, but more importantly, the end strength of the stitching pattern. You choose.
d) once both ends are properly sewed, flatten the end that goes back into the inner spool of the retractor, carefully thread it in (the correct placement), until it comes out the wider slot and you've got sufficient length to work with. Then insert the plastic piece in the end gap, and pull it back out so it fits snugly into the wider spool slot, ensuring it's level to the surface of the metal spool. You're now ready to wind the new replacement webbing onto the spool. Remove the screwdriver/zip-tie (or whatever you've used) and slowly allow the spool to rotate and wind up the new webbing. Sewing both ends before re-installation, is what I saw on one YouTube video, which is why I followed that method, to start.
OR (IMO and better yet) consider doing what I did for the second seatbelt. Instead of sewing both ends and then installing the new webbing onto the retractor mechanism, I took the entire seatbelt assembly to the tailor. He sewed the one end with the seat bolt...and THEN we threaded the other end into the retractor spool, before sewing that end. That way, that end of the new seatbelt was completely flat (it wasn't sewed and double-layered) and went into the inner retractor spool, MUCH easier. Once it's in, pull out a sufficient length, so the tailor can then sew that end. Then insert the white plastic piece into that end, and then pull the new webbing back, until that thicker end fits snugly/level into the metal inner spool wider gap (as above).
e) the rest is the reverse, putting everything back together. The hardest part for me, was putting the new webbing correctly onto the inner retractor spool. Please do look at some YouTube videos, to better show the process. If you're like me and this is your first time doing this, I don't recommend simply relying upon this thread, although I've made it fairly detailed. Sorry about my "made-up terminology" above. There's likely proper names for many of the components, that I've not used, but my explanation should still make sense.
FYI, I purchased my new webbing from "AliExpress" since I wanted something different than simply a solid color. They had a much better selection. See the second last photo above, which shows my replacement webbing (black/dual red stripes) ready to go, in the background. Mine came as one long roll, which I first cut in half...then cut again once measured against each OEM length. Mine also came with new "plastic black buttons" that snap onto the new seatbelt (one each side of the belt), although if you don't get them with your replacement webbing, they can be easily found and my tailor offered me several choices.
You can always remove the entire seatbelt assembly, then ship it to a business that replaces webbing, however I didn't find any of them with the type of replacement webbing I wanted: most only had solid colors. Some people may not trust the "made-in-China" webbing I purchased, but I'm satisfied it's OK and note that most seatbelt webbing used by car manufacturers, looks to come from China, anyway. It certainly looked to be the same quality webbing, as OEM. I wasn't able to get a local installer for this job. The ones I spoke with, said they'd only replace with OEM webbing...and all new OEM parts (ie. including the retractor mechanism, belt buckle, etc.); likely due to their liability concerns. None would install new webbing that I'd provide them nor use the original parts, leaving me no choice but to do this myself. Perhaps you'll have better luck finding someone in your area to do this for you, if like me, you're not happy with the selection offered by the "mail order replacement webbing businesses" and choose not to use one of them.
Sorry for the long read. Hope this helps and good luck!!
Last edited:
