Good stuff on this thread as I found it has really helped weighing in pros and cons of splitter alternatives. Interesting how many variables play in to deciding on one. There are the issues of "looks" (very subjective), quality, economics, functionality and practicality, and I probably missed others.
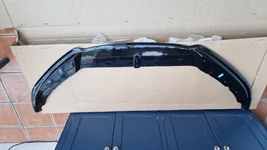
From a "looks" dept., and again a very subjective matter, there's the CF vs Gloss Black preference where I prefer GB to match the black pack (not really a fan of Glossy CF anyway). I also find the upward edge fin design on some splitters to interfere with the lower side bumper curvature and continuous crease line. Another disadvantage is that presumably those fins can collect debris and add cleaning difficulty. I also dislike splitters that protrude frontward too much, not only from an aesthetic perspective, but because they require added caution on approaching parking barriers etc.
To be fair, imo, the TRC splitter I installed has its own significant downsides too, the biggest one being its very low ground clearance. I would prefer it to allow for at least an inch more. The bottom of mine has already kissed the ground a couple of occasions, the 2 hockey puck protectors being well above the ground clearance line of my splitter. At 65, I'm not exactly young, but now I feel, and most certainly must appear to any observing outsider, like I'm 85 when I park my Emira

. While I prefer the GB color to match with the black pack, I can definitely detect the better fit & finish of most of the CF ones vis-a-vis my TRC fiberglass made splitter. The pricing delta surely plays a significant part in the quality difference here where the TRC (and perhaps other non-CF variants) come out to about 1/2 or even 1/3 of CF versions.
Leaving all subjective preferences to a side however, the one arguable shared benefit of this mod on our Emiras is that it becomes fairly easily to remove/replace/change with unnoticeable residual damage as most install using existing under belly holes. In my case, I only had to add a small hole on each outer edge + 1 in the center.