Front splitter only

Anyone installed this yet? Feedback?

Hi Guys,

I actually installed this splitter some 3 weeks ago.
Imo, it to looks good, matching well with the contours of the lower bumper and the gloss black. It's a good value compared to the pricing of other alternatives. My suspension is lowered only in the rear which I did simply to match the front fender/tire gap, so the car's front hight remained OEM. So with the splitter installed, ground clearance does get kind of low at 4 1/4" forcing me to now be extra careful maneuvering around ramps and parking spots. As another member mentioned earlier in the thread, I'm also considering this as a sacrificial part which, if it comes to it, I'd rather get damaged and replace instead of the front bumper.
From the included mounting hardware kit that came with splitter, I only used 2 coarse screws that secure its far edges and I preferred to use flat head rivet nuts for all the other mounting holes. I consider this a cleaner and easier mounting alternative which had the added benefit of not requiring removal of any of the under panels. As far as drilling new holes in the bumper's under section, I drilled two small guiding holes to secure the splitter's far edges and 3 additional ones for the flat head rivet nuts. There are two holes in the middle section of the splitter, but I used only one of them since it was more than enough to secured it firmly. Below are some pics and I hope you find this helpful If you're also contemplating doing this.


IMG_2342.webpIMG_2346.webpIMG_2345.webp.
 
Hi Guys,

I actually installed this splitter some 3 weeks ago.
Imo, it to looks good, matching well with the contours of the lower bumper and the gloss black. It's a good value compared to the pricing of other alternatives. My suspension is lowered only in the rear which I did simply to match the front fender/tire gap, so the car's front hight remained OEM. So with the splitter installed, ground clearance does get kind of low at 4 1/4" forcing me to now be extra careful maneuvering around ramps and parking spots. As another member mentioned earlier in the thread, I'm also considering this as a sacrificial part which, if it comes to it, I'd rather get damaged and replace instead of the front bumper.
From the included mounting hardware kit that came with splitter, I only used 2 coarse screws that secure its far edges and I preferred to use flat head rivet nuts for all the other mounting holes. I consider this a cleaner and easier mounting alternative which had the added benefit of not requiring removal of any of the under panels. As far as drilling new holes in the bumper's under section, I drilled two small guiding holes to secure the splitter's far edges and 3 additional ones for the flat head rivet nuts. There are two holes in the middle section of the splitter, but I used only one of them since it was more than enough to secured it firmly. Below are some pics and I hope you find this helpful If you're also contemplating doing this.

View attachment 73209View attachment 73210View attachment 73211.
Nice. Thanks for the write up. What size flat head rivet nuts did you use? I want to fit mine the same. Makes removing it easier at a later date as well.
 
I really like the lip on the GT4. Does anyone know of any shops that sell this in piano black? Found it on eBay and AliExpress but wary of ordering a large item like this via these sites.
 
Nice. Thanks for the write up. What size flat head rivet nuts did you use? I want to fit mine the same. Makes removing it easier at a later date as well.
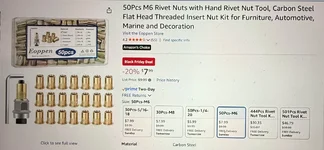
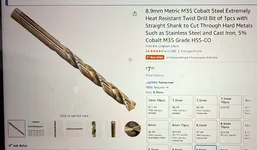
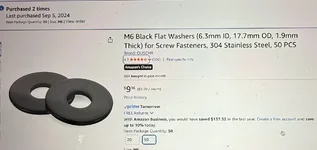
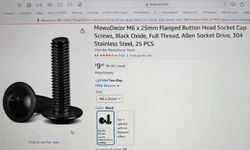
Yes precisely, and that was another reason I opted not to use the silicone/glue as it really doesn't need it once the splitter it's bolted in. Instead, I used 3M double sided tape in some sections which helped me to center and hold in place during the mounting process. I added pics below of all the hardware I purchased on Amazon for this.

Note: Apply very light pressure on the drill/bit when making the rivet holes to avoid damaging the panel behind the plastic bumper.

IMG_2419.webpIMG_2418.webpIMG_2416.webpIMG_2414.webp
 
Yes precisely, and that was another reason I opted not to use the silicone/glue as it really doesn't need it once the splitter it's bolted in. Instead, I used 3M double sided tape in some sections which helped me to center and hold in place during the mounting process. I added pics below of all the hardware I purchased on Amazon for this.

Note: Apply very light pressure on the drill/bit when making the rivet holes to avoid damaging the panel behind the plastic bumper.

View attachment 73244View attachment 73245View attachment 73246View attachment 73247
Thanks a lot for this.
 
Installed the lip and side skirts from Triple
R Composites. I have to angle it to get out of my drive way and I’m on stock suspension. But i do have a steep decline at the end of my drive way. I did have to pay tariffs to DHL before arrival. It was pretty quick delivery. It came in a few days.
IMG_2980.webp


IMG_7874.webp
 
It’s actually touching there. I had to move forward and angle it more to get out haha
Just in case you don't know about these - check out `Sliplo` to protect against scraping. I have a couple on the front of my car they seem to work fairly well. Some people install loads of them but I just have a couple on each side where I can see the front will scrape first.

https://sliplo.shop/ although I got mine from Amazon.
 
Just in case you don't know about these - check out `Sliplo` to protect against scraping. I have a couple on the front of my car they seem to work fairly well. Some people install loads of them but I just have a couple on each side where I can see the front will scrape first.

https://sliplo.shop/ although I got mine from Amazon.
That home page is cringe worthy :)
But an interesting addition, that I may now have to think about
 
Installed the lip and side skirts from Triple
R Composites. I have to angle it to get out of my drive way and I’m on stock suspension. But i do have a steep decline at the end of my drive way. I did have to pay tariffs to DHL before arrival. It was pretty quick delivery. It came in a few days.
View attachment 74754

View attachment 74755
Hi,

How is the overal quality and fittings of these?
 
So the bottom of the kit isn’t finished out. It’s like a top mold only. Which is fine for me with the price and having it hollow under works better for my drive way. But I can see it getting damaged easier. I wouldn’t be able to attach any skid guards The Fitment is pretty good and the holes line up with the ones already on the bumper. Side skirts were super easy install with no extra drilling. Front bumper requires 4 more drill holes and 2 tapping screws on the end
IMG_3005.webp
 
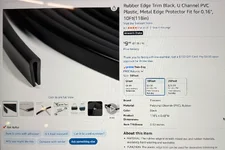
For those who purchased the TRC front splitter, as I mentioned in my earlier post, the resulting ground clearance is fairly low, in my case leaves only 4 1/4", so you're bound to inflict a scrape or two on ramps, steep driveways, etc. Like other members, given its fairly reasonable price, I also consider it to be sort of a sacrificial part which I'd much rather damage than the OEM lower bumper. Having said this however, I found and installed a rubber U channel along the bottom edge of the splitter. This adds a bit more protection from bottoming out scrapes. The TRC splitter is made of a fiberglass and can easily splinter or chip when scrapped by a rough surface. This rubber U channel trim holds firmly in place without the need of glue or tape and adjusts perfectly around the splitter's contours. Here's a picture of my installation and the rubber U channel (need to zoom in to see it as it blends very well with the gloss black of the splitter). I also attached a picture of the product's description on Amazon.
Hope you find this helpful.

IMG_2708.webpIMG_2709.webp
 
So the bottom of the kit isn’t finished out. It’s like a top mold only. Which is fine for me with the price and having it hollow under works better for my drive way. But I can see it getting damaged easier. I wouldn’t be able to attach any skid guards The Fitment is pretty good and the holes line up with the ones already on the bumper. Side skirts were super easy install with no extra drilling. Front bumper requires 4 more drill holes and 2 tapping screws on the end View attachment 74771
Can the front lip be fitted without extra drilling?
 
For those who purchased the TRC front splitter, as I mentioned in my earlier post, the resulting ground clearance is fairly low, in my case leaves only 4 1/4", so you're bound to inflict a scrape or two on ramps, steep driveways, etc. Like other members, given its fairly reasonable price, I also consider it to be sort of a sacrificial part which I'd much rather damage than the OEM lower bumper. Having said this however, I found and installed a rubber U channel along the bottom edge of the splitter. This adds a bit more protection from bottoming out scrapes. The TRC splitter is made of a fiberglass and can easily splinter or chip when scrapped by a rough surface. This rubber U channel trim holds firmly in place without the need of glue or tape and adjusts perfectly around the splitter's contours. Here's a picture of my installation and the rubber U channel (need to zoom in to see it as it blends very well with the gloss black of the splitter). I also attached a picture of the product's description on Amazon.
Hope you find this helpful.

View attachment 77064View attachment 77065
Didn't know it's fiber glass. Thought it was abs plastic. I'd rather it be abs plastic as it takes a scrap better you can sand out
 
Didn't know it's fiber glass. Thought it was abs plastic. I'd rather it be abs plastic as it takes a scrap better you can sand out
Agree, but it's made of fiberglass. You can see the fiberglass texture of its underside in @Simba's posted picture above. On the positive side though, it has a nice black gloss finish that matches well to the rest of the OEM's black and once installed it stays firmly in place and it's a sturdy piece.
 
Agree, but it's made of fiberglass. You can see the fiberglass texture of its underside in @Simba's posted picture above. On the positive side though, it has a nice black gloss finish that matches well to the rest of the OEM's black and once installed it stays firmly in place and it's a sturdy piece.
Yea that's why i like it cause it matches the piano black trim. My roads are pretty bad here, not sure it would last long. I have a splitter on my BMW and had scraped many times but it's abs so i was able to just sand the scuffs out.
 
So after much deliberation I committed to a C/F splitter from Aerie Performance. Took a while to arrive but the fit and finish was excellent (gloss C/F with herringbone pattern - to match my Aerie diffuser). Only negative (apart from the wait) was mounting it on the car. It was supplied pre-drilled with half a dozen self tapping screws but I doubt these would be sufficient given the forces acting on the splitter. So instead I fitted M5 rivet nuts to the existing mounting holes on the underside of the front bumper (also drilled 4 new holes where the originals aligned with the very back edge of the splitter) and re-drilled the splitter to match. So now (in true Lotus undertray fashion!) the splitter is held in place by 2 x M6 bolts and 12 x M5 bolts. It’s very sturdy (no need for double-sided tape) and looks great. Ground clearance lower than stock but not too bad. The round alloy and plastic wedge-shaped bump stops under the nose would hit the ground before the splitter.
 

Attachments

  • IMG_0930.webp
    IMG_0930.webp
    594.9 KB · Views: 147
So after much deliberation I committed to a C/F splitter from Aerie Performance. Took a while to arrive but the fit and finish was excellent (gloss C/F with herringbone pattern - to match my Aerie diffuser). Only negative (apart from the wait) was mounting it on the car. It was supplied pre-drilled with half a dozen self tapping screws but I doubt these would be sufficient given the forces acting on the splitter. So instead I fitted M5 rivet nuts to the existing mounting holes on the underside of the front bumper (also drilled 4 new holes where the originals aligned with the very back edge of the splitter) and re-drilled the splitter to match. So now (in true Lotus undertray fashion!) the splitter is held in place by 2 x M6 bolts and 12 x M5 bolts. It’s very sturdy (no need for double-sided tape) and looks great. Ground clearance lower than stock but not too bad. The round alloy and plastic wedge-shaped bump stops under the nose would hit the ground before the splitter.
Looks and fits great. Any front view picture?
 

Create an account or login to comment

Join now to leave a comment enjoy browsing the site ad-free!

Create account

Create an account on our community. It's easy!

Log in

Already have an account? Log in here.

Supporting Vendors View all →
Back
Top