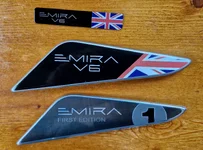
Check out these babies!!

Do the key covers go on-top of existing key or replace silver bits?

How do I go about ordering one?
Its a brand new oem keycase that you switch to. Shipping to Australia is around 80 USD so a group buy to split the cost of shipping might be a better deal.
 
Its a brand new oem keycase that you switch to. Shipping to Australia is around 80 USD so a group buy to split the cost of shipping might be a better deal.
Any other Aussie guys interested? I'm happy to receive the shipment and organise forwarding
 
Mine arrived and are on. Hardest bit was getting the backing off the sticky pads lol
Red isn't as red as I would have liked, but they look pretty swish and am pleased.
Thanks all those involved in making this happen.
 

Attachments

  • BADGES.webp
    BADGES.webp
    183.2 KB · Views: 105
  • BADGES2.webp
    BADGES2.webp
    386 KB · Views: 99
Mine arrived and are on. Hardest bit was getting the backing off the sticky pads lol
Red isn't as red as I would have liked, but they look pretty swish and am pleased.
Thanks all those involved in making this happen.
Judging from your picture, the Union Jack's red does look a bit faded. Wondering if it's particular to your badges or if coloring on all others with UJs are alike.
 
Judging from your picture, the Union Jack's red does look a bit faded. Wondering if it's particular to your badges or if coloring on all others with UJs are alike.
cc55829500dbd8323b74f8dd8b5f2b96.webp

Judging from my own eyes they are not as red as the oem red but definitely not as pale, probably it's the camera. If we could get the paint code for the vendor that will definitely help.
 
Hi guys,

While we wait for the US bound badges, please DM me your shipping recipient name and address, so that I can calculate domestic shipping cost once I receive the badges.
@Bond_42, @OliverB, @SenecaBlue, @Driver75 , @LastManualLegit, @T6061, @Socrates, @NicolasB, @scalpgawd, @itspbjtime, @007Lotus007, @1stEmiraNow2Clarks.

I already have your shipping info, @crestima, @Eagle7.

@Martin_S and @NSXer, the UK shipping turned out to be 28.28USD more than the original quote, I've asked @Orchardbike to send me the difference. Please send him 9.43USD each.

Thanks!
 
Hey guys,

The US badges have arrived!
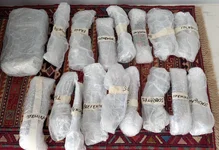
@675430VME packaged everting individually so I will ship them like this. Unfortunately no group photo of all the badges, just the drug bust photo.

- If I have your address, you should see a shipping label with tracking via DM. Please confirm your address.
- Please send me the remainder of your cost via the same method, make sure it's net to me.
- After I receive your confirmation and payment, I will ship your package. Earliest this weekend.

At last!
 

Attachments

  • 1788934178251.webp
    1788934178251.webp
    329.9 KB · Views: 86
Hey guys,

The US badges have arrived!
@675430VME packaged everting individually so I will ship them like this. Unfortunately no group photo of all the badges, just the drug bust photo.

- If I have your address, you should see a shipping label with tracking via DM. Please confirm your address.
- Please send me the remainder of your cost via the same method, make sure it's net to me.
- After I receive your confirmation and payment, I will ship your package. Earliest this weekend.

At last!
Drug bust photo 🤣
 
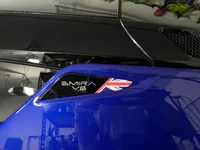
Received mine today! They turned out so good. They look even better in person than in pictures. The camera lightens up the colors. They're stronger than this picture shows. Actually, the small dash badge on the bottom looks more accurate.

IMG_3653 2.webp


Getting the olds ones off was a bit of a challenge. I used 10 weight monofilament fishing line. I used the wife's hair dryer on low heat to warm up the badge which helped in getting them off the car. The picture below shows where the 3M tape is so you can see where to work the tape off with the fishing line. There's a horizontal piece on the back behind the peg hole, a vertical piece in the middle, and a diagonal piece on the front. Once you get the rear piece loose, you have to feed the fishing line through behind the badge on the other side of the hole, so you can start working that one off. I used the hair dryer again to soften the residue that was left, and used GooGone to remove all the leftover tape gum.

IMG_3655.webp


The difference compared to the factory. The factory badges aren't bad, I just think they're a little plain compared to the looks of the car itself.

IMG_3654 2.webp


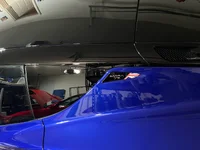
This style looks SO good against Dark Verdant. I was doing this in the evening in the garage, so the lighting is a little dark. The camera is boosting things to compensate.

IMG_3657.webp


I'll do the dash badge tomorrow when it's daylight, and I'll get the car outside for some better pictures.

I'm VERY happy with how these turned out. Thank you to @675430VME and @beefeater for their part in making all this happen.
 
Received mine today! They turned out so good. They look even better in person than in pictures. The camera lightens up the colors. They're stronger than this picture shows. Actually, the small dash badge on the bottom looks more accurate.

View attachment 88464

Getting the olds ones off was a bit of a challenge. I used 10 weight monofilament fishing line. I used the wife's hair dryer on low heat to warm up the badge which helped in getting them off the car. The picture below shows where the 3M tape is so you can see where to work the tape off with the fishing line. There's a horizontal piece on the back behind the peg hole, a vertical piece in the middle, and a diagonal piece on the front. Once you get the rear piece loose, you have to feed the fishing line through behind the badge on the other side of the hole, so you can start working that one off. I used the hair dryer again to soften the residue that was left, and used GooGone to remove all the leftover tape gum.

View attachment 88465

The difference compared to the factory. The factory badges aren't bad, I just think they're a little plain compared to the looks of the car itself.

View attachment 88467

This style looks SO good against Dark Verdant. I was doing this in the evening in the garage, so the lighting is a little dark. The camera is boosting things to compensate.

View attachment 88466

I'll do the dash badge tomorrow when it's daylight, and I'll get the car outside for some better pictures.

I'm VERY happy with how these turned out. Thank you to @675430VME and @beefeater for their part in making all this happen.
Very nice, they are so classy comparing to the oem! Love the contrast!
BTW, no need to remove the original but just stack the new dash badge on top and it will stay in place.
 
Received mine today! They turned out so good. They look even better in person than in pictures. The camera lightens up the colors. They're stronger than this picture shows. Actually, the small dash badge on the bottom looks more accurate.

View attachment 88464

Getting the olds ones off was a bit of a challenge. I used 10 weight monofilament fishing line. I used the wife's hair dryer on low heat to warm up the badge which helped in getting them off the car. The picture below shows where the 3M tape is so you can see where to work the tape off with the fishing line. There's a horizontal piece on the back behind the peg hole, a vertical piece in the middle, and a diagonal piece on the front. Once you get the rear piece loose, you have to feed the fishing line through behind the badge on the other side of the hole, so you can start working that one off. I used the hair dryer again to soften the residue that was left, and used GooGone to remove all the leftover tape gum.

View attachment 88465

The difference compared to the factory. The factory badges aren't bad, I just think they're a little plain compared to the looks of the car itself.

View attachment 88467

This style looks SO good against Dark Verdant. I was doing this in the evening in the garage, so the lighting is a little dark. The camera is boosting things to compensate.

View attachment 88466

I'll do the dash badge tomorrow when it's daylight, and I'll get the car outside for some better pictures.

I'm VERY happy with how these turned out. Thank you to @675430VME and @beefeater for their part in making all this happen.
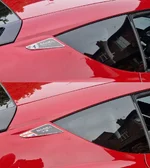
That looks great!! I'll be putting mine on next week when the car arrives 👍👍 is be interested in seeing how you attach the dash badge as I'm not keen on sticking it on top of the original badge. So glad you put your design out there months ago!!
 
I think I’m the only one who didn’t want the rim around the badges and I absolutely love it! Thanks to all those who made this possible!
 

Attachments

  • IMG_1164.webp
    IMG_1164.webp
    130.9 KB · Views: 65
  • IMG_1163.webp
    IMG_1163.webp
    114.9 KB · Views: 40
I think I’m the only one who didn’t want the rim around the badges and I absolutely love it! Thanks to all those who made this possible!
That really works well for your color combo.
 

Create an account or login to comment

Join now to leave a comment enjoy browsing the site ad-free!

Create account

Create an account on our community. It's easy!

Log in

Already have an account? Log in here.

Supporting Vendors View all →
Back
Top