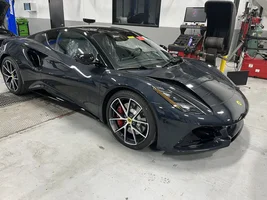
Aerie carbon paddle installed on i4 - Very Happy

I, too ordered well before my car delivery. Wish they also offered aluminum/metal paddles instead (like the Porsche ones) since carbon feels out of place.
I figured the satisfying click will overcome that :)
Have you thought about wrapping it? I was thinking of doing that to my Carbon fiber paddle shifters, that or paint them if they look out of place.
 
I completed the install of mine this weekend and highly recommend the mod. As an avid sim racer with some really nice magnetic shift wheels (Cube Controls, Ascher Racing), this mod makes my real life car feel very similar. I suspect this is close to the shifter feel you get in the Emira GT4 race car as well.

I couldn't find any install instructions online, so I used a guide Gregs Race Parts provided for removing the steering wheel. I used the steering wheel removal guide and some tinkering to get the swap done. Here's some tips I hope others may find helpful to prevent any damage to their wheel while doing this. I was extremely nervous as my car is brand new with only 10km on the odometer.

- Jamming a square/Robertson screwdriver into the holes on the side to release the airbag was easier than using a flathead. The flathead wouldn't catch the spring release mechanism, but using something more blunt made it extremely easy
- Removing the gloss black circular trim piece behind the airbag was difficult. There were 2 clips on the bottom and 1 on the top you have to carefully release before trying to pry or pull the entire piece back. The trim piece is pushed into the grey foam with some inserts that holds it in so you have to carefully wiggle and tug with some force to get it to release. It was a fine balance of force and trying to be careful not to break or scratch this piece.
- Removal of the steering wheel buttons on both sides is required. At first glance there are 3 silver T6 bolts that look like they need to be removed to release it. Don't unscrew these! There is a circuit board inside that looks quite sensitive. You have to just pull and wiggle the entire button assembly and you will start to see it release slowly. Mine were very tight and required both force and finesse to avoid breaking anything.
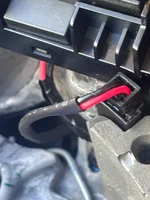
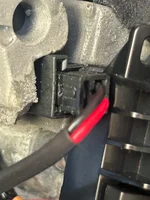
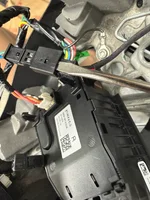
- The shifters have a 2 pin plug that needs to be removed. It looks easy to unplug but there is a little tab on the plug that holds it in place. It looks like it shouldn't be that hard to remove, but I struggled more than I would have liked to remove it. I ended up using a small pick and inserted it into the plug to get the little tab to release.

The rest of it was pretty straightforward. I'm glad I didn't break anything, but there were many times I thought I would. Good luck to those DIYing this!
 

Attachments

  • PXL_20250303_003504455.webp
    PXL_20250303_003504455.webp
    176.1 KB · Views: 310
  • PXL_20250303_002905991.webp
    PXL_20250303_002905991.webp
    120.9 KB · Views: 356
  • PXL_20250303_000749031.webp
    PXL_20250303_000749031.webp
    203.2 KB · Views: 379
  • PXL_20250302_224924729.webp
    PXL_20250302_224924729.webp
    118.4 KB · Views: 365
Have you thought about wrapping it? I was thinking of doing that to my Carbon fiber paddle shifters, that or paint them if they look out of place.
Thought about having a shop paint it, but it's like $250 or so. Not worth to do, haha.
 
I completed the install of mine this weekend and highly recommend the mod. As an avid sim racer with some really nice magnetic shift wheels (Cube Controls, Ascher Racing), this mod makes my real life car feel very similar. I suspect this is close to the shifter feel you get in the Emira GT4 race car as well.

I couldn't find any install instructions online, so I used a guide Gregs Race Parts provided for removing the steering wheel. I used the steering wheel removal guide and some tinkering to get the swap done. Here's some tips I hope others may find helpful to prevent any damage to their wheel while doing this. I was extremely nervous as my car is brand new with only 10km on the odometer.

- Jamming a square/Robertson screwdriver into the holes on the side to release the airbag was easier than using a flathead. The flathead wouldn't catch the spring release mechanism, but using something more blunt made it extremely easy
- Removing the gloss black circular trim piece behind the airbag was difficult. There were 2 clips on the bottom and 1 on the top you have to carefully release before trying to pry or pull the entire piece back. The trim piece is pushed into the grey foam with some inserts that holds it in so you have to carefully wiggle and tug with some force to get it to release. It was a fine balance of force and trying to be careful not to break or scratch this piece.
- Removal of the steering wheel buttons on both sides is required. At first glance there are 3 silver T6 bolts that look like they need to be removed to release it. Don't unscrew these! There is a circuit board inside that looks quite sensitive. You have to just pull and wiggle the entire button assembly and you will start to see it release slowly. Mine were very tight and required both force and finesse to avoid breaking anything.
- The shifters have a 2 pin plug that needs to be removed. It looks easy to unplug but there is a little tab on the plug that holds it in place. It looks like it shouldn't be that hard to remove, but I struggled more than I would have liked to remove it. I ended up using a small pick and inserted it into the plug to get the little tab to release.

The rest of it was pretty straightforward. I'm glad I didn't break anything, but there were many times I thought I would. Good luck to those DIYing this!

This is a nice write-up, thanks! Seeing them installed has me ready to wait for the Aerie paddles. The ones from GRP are just not a large enough upgrade in size for me. I want the tactile 'CLICK' and the longer ears on the paddle. Thanks again for the write-up...I am sure this will get lots of traffic as I think it's the only one out there to date.
 
Last edited:
- The shifters have a 2 pin plug that needs to be removed. It looks easy to unplug but there is a little tab on the plug that holds it in place. It looks like it shouldn't be that hard to remove, but I struggled more than I would have liked to remove it. I ended up using a small pick and inserted it into the plug to get the little tab to release.
This.

i just did my install and this part was by far the biggest PIA. I ended up using a eyeglass/Jewelry flat screwdriver to push the mini tab down to be able to pull out the tiny plug.

Again, @chowdis thank you for the write-up. His write-up, along with GRP's steering wheel removal instructions and a youtube video that another member posted on the steering wheel removal made this an easy 1 hour job. I took closer to 90-100 mins with 30-40 mins. burned on trying to remove the crazy 2 pin plug on the actual paddles.
 
Just another +1 for the 2 pin connector struggle bus, lol.
 
Hey everyone,

I did the installation yesterday; it went well, but I have an issue and I'm not sure if it's related.

My Emira is almost brand new; I hardly ever use it.

When I went to test out the paddles, I noticed that I no longer have any radio sound... I can select the radio station and even YouTube Music via Android Auto, but there’s no sound even though the volume is set.

Could this be due to the battery being disconnected, or maybe a loose connector?

Everything else works...

Thanks!
 
Hey everyone,

I did the installation yesterday; it went well, but I have an issue and I'm not sure if it's related.

My Emira is almost brand new; I hardly ever use it.

When I went to test out the paddles, I noticed that I no longer have any radio sound... I can select the radio station and even YouTube Music via Android Auto, but there’s no sound even though the volume is set.

Could this be due to the battery being disconnected, or maybe a loose connector?

Everything else works...

Thanks!
does the infotainment make any sounds at all? such as touching the screen items (assuming the button feedback option is still selected). should be unrelated, even if you somehow damaged the wheel controls, it would move the volume up or down or activate the mute/pause (which you'd notice). unplug the battery for 15 minutes and try again? I've installed and uninstalled the paddles with no issues.
 
Tried to remove the oem paddle shifter but got frustrated when I got to the dreaded 2-pin cable, so I decided to put everything back. Anyone can share of where exactly on the 1-pin housing I should focus on? Here are some photos of the area that I was working with. TIA
 

Attachments

  • IMG_5022.webp
    IMG_5022.webp
    116.1 KB · Views: 68
  • IMG_5021.webp
    IMG_5021.webp
    184.3 KB · Views: 60
Dreaded in deed. Firstly, remove the paddle by taking the wheel off and removing all of he screws so that only the harness prevents separation/removal. Do one at a time. Once you have one dangling by this harness, I used a tiny jeweler/glasses frame flat screwdriver to help gently pry it loose.

You can tell where to insert it by looking at the shape of the new one to figure out where the male and female parts end/begin. I think I posted pics as well. Just look at my posts history to find it.
 
Just installed this morning. That 2pin connector was the toughest part of the job. I held the steering wheel end with pliers and was able to wiggle the paddle connector firmly with needle-nosed pliers. It took a little tug but they both came out unscathed. Took for a test drive and definitely a great upgrade!
 
Agreed, I added mine (grp though) a month or so ago and much better. I do wish they had a little more resistance to the pull though and the click/sound when shifting didn’t feel so much like a video game wheel. Nitpicking I know, but they are so much better nonetheless.
 
IMG_1975.webp
This is your best friend in the install. Shove in to create gap, and pull right out. Easy peasy
 

Attachments

  • IMG_1977.webp
    IMG_1977.webp
    189.1 KB · Views: 59
Last edited:
Tried to remove the oem paddle shifter but got frustrated when I got to the dreaded 2-pin cable, so I decided to put everything back. Anyone can share of where exactly on the 1-pin housing I should focus on? Here are some photos of the area that I was working with. TIA
Ok, had to look thru all my install pictures.

Like others have said, stick a tiny flathead screwdriver in to push down lever (marked by blue arrow) to dislodge retention clip (marked by red arrow)

Should be easy removal, it's not super tight slip fit like other harnes plugs.

Hope this helps.

28178.webp
 

Create an account or login to comment

Join now to leave a comment enjoy browsing the site ad-free!

Create account

Create an account on our community. It's easy!

Log in

Already have an account? Log in here.

Back
Top