JB4 Issues

You just gave me hope. The new board that Terry is sending me is supposed to be here on Saturday. Did you change the board yourself? Pretty easy? Glad that you got sorted!!

Yes, I did the install, testing and when it arrived, the change of board. Very easy to do.
I hope it works out for you. A gain of, in my case, 60 hp, and 33 NM of torque as three of us noticed, does make a huge improvement, considering every other engine component remains stock standard.
All the best.
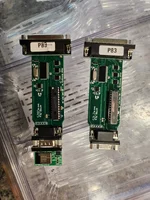
 
Changed out the board fellas and still getting the CEL above 5k. Tried to pull the code with the JB4 and it says there is no code present. So frustrated.....
 

Attachments

  • 20260522_123241.webp
    20260522_123241.webp
    297.5 KB · Views: 85
Maybe I missed it but do you get CEL on map 0? Do you get CEL when you remove the jb4 completely out of the loop?
 
Maybe I missed it but do you get CEL on map 0? Do you get CEL when you remove the jb4 completely out of the loop?
Yes I do get a CEL on Map 0. I had to pay to get it installed. I don't have the tools to reach that lower sensor so I haven't unplugged the JB4 completely...
 
Yes I do get a CEL on Map 0. I had to pay to get it installed. I don't have the tools to reach that lower sensor so I haven't unplugged the JB4 completely...
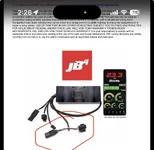
The two cables that come up from the bottom sensor (a set of brown and black wires) can be plugged together. It goes from original cable harness -> jb4 extension cable -> jb4 plug and then from the other jb4 plug -> jb4 extension harness -> sensor. Just disconnect the extension plugs that go into the jb4 plugs and connect them together.

The easy to reach sensor, just revert back to original harness.

After that, jb4 is bypassed. If you need pictures I can probably get some to you tomorrow as my engine is currently too hot to get to that location.

Edit:
Jb4 install has a picture of the plug I’m talking about. See the circled plugs, disconnect the extension cables coming from the bottom of your engine and connect them to each other, make sure you don’t bend the pins
 

Attachments

  • IMG_5633.webp
    IMG_5633.webp
    99.8 KB · Views: 81
The two cables that come up from the bottom sensor (a set of brown and black wires) can be plugged together. It goes from original cable harness -> jb4 extension cable -> jb4 plug and then from the other jb4 plug -> jb4 extension harness -> sensor. Just disconnect the extension plugs that go into the jb4 plugs and connect them together.

The easy to reach sensor, just revert back to original harness.

After that, jb4 is bypassed. If you need pictures I can probably get some to you tomorrow as my engine is currently too hot to get to that location.

Edit:
Jb4 install has a picture of the plug I’m talking about. See the circled plugs, disconnect the extension cables coming from the bottom of your engine and connect them to each other, make sure you don’t bend the pins

I believe that’s an older version. Newer versions don’t have the extension separated. It’s all one piece.
 
HOPE YOU ARE READING THIS TERRY FROM BURGER TUNING!

If the newer JB4 versions for the AMG are one piece, that is, connected directly into the JB4 module, with no joining plugs, that is a dreadful choice of re-design. To disconnect the lower really hard to get at MAF sensor and plug back in the OEM connecting plug just to disengage the JB4, even for testing or temporary removal as required, becomes a ridiculously difficult and backward step. At least having a harness that can stay plugged in, as is, to the lower sensor and simply be connected into itself (via the brown-black wire plugs) further up near the top of the engine to complete an MAF circuit is by far the better option.
Mr.Gear, are you sure the backward step of deleting the harness is actually factual?
 

Create an account or login to comment

Join now to leave a comment enjoy browsing the site ad-free!

Create account

Create an account on our community. It's easy!

Log in

Already have an account? Log in here.

Supporting Vendors View all →
Back
Top