geoffbland
Emira Addict
I’ve had a go at repairing this myself and, so far, it seems to have worked. I thought I’d post the method in case anyone else wants to have a go rather than repeatedly replacing the panel.
The side panels on the Emira seats have a thin plastic latch in the upper middle of the panel. Unfortunately, this latch is under quite a lot of pressure whenever the seat is occupied and is constantly being flexed as you move around in the seat and get in and out of the car.
In my opinion, it’s simply not a particularly good design. The thermosetting plastic is quite thin for the job and the latch is secured against a metal peg. Sooner or later, with normal use, the plastic is likely to fatigue and break.
If you have fitted something such as a rubber bead to the top of the seat panel to protect the leather, this puts even more pressure on the latch. The fact that the sharp edge of the plastic panel does also wear the leather is another aspect of the design that could have been better.
You can get the panel replaced under warranty if the car is under three years old, provided you haven’t fitted something such as a protective bead. However, you may have to wait several months for the replacement part.
Alternatively, you can pay for the replacement yourself. In my case, the part and fitting cost £75, but again, you still have to wait for the part.
The problem with either approach is that the replacement panel uses exactly the same design, so sooner or later it is likely to break in exactly the same place again.
Having already gone through three panels, I decided to try repairing the existing panel with something stronger, but with enough flexibility to hopefully withstand the movement and last considerably longer.
What you will need
Parts
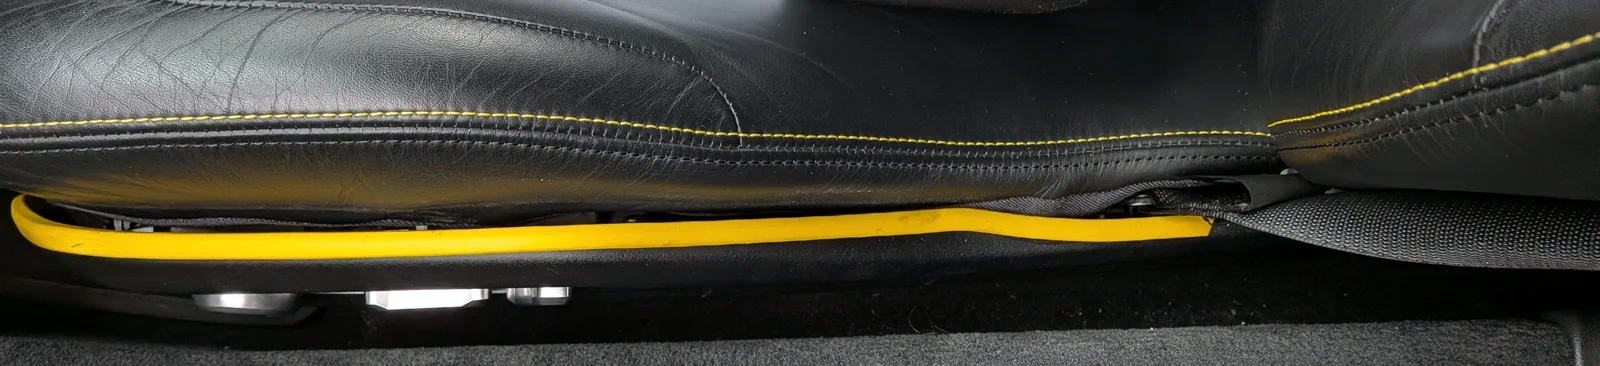
Photo 1 – My broken passenger seat panel. The gap gets wider when someone sits in the seat.
Before starting, it’s worth having a look at how the panel is constructed and how it attaches to the seat.
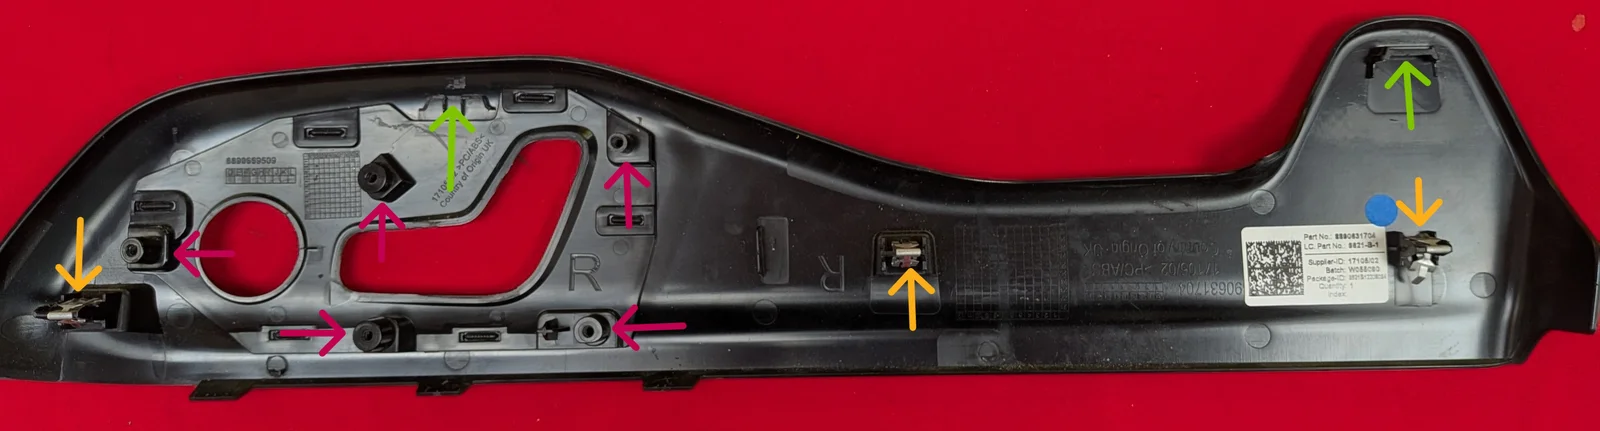
Photo 2 – Seat side panel layout
The 2 green arrows show the two plastic latches.
It is the more central latch, located roughly in the middle of the seat base, that has broken on mine. The other latch, towards the seat back, hasn't broken. It isn't subjected to anything like as much pressure or flexing, although I suppose it could eventually suffer the same fate.
The 3 orange arrows show the metal panel push clips which secure the bottom of the panel. These quite often get mangled when the panel is removed.
The 5 pink arrows show the mounting points for the seat controls.
You do not need to remove the seat controls for this repair. In fact, I would strongly recommend leaving them in place, as they are quite fiddly to remove and refit.
Step 1 – Remove the seat panel
First, remove the side panel from the seat.
Start by pulling the bottom of the panel outwards to release the three panel push clips.
Then pull upwards on the rear of the panel, close to the seat back, to release the remaining latch. You might need to wiggle the panel a bit to get it free.
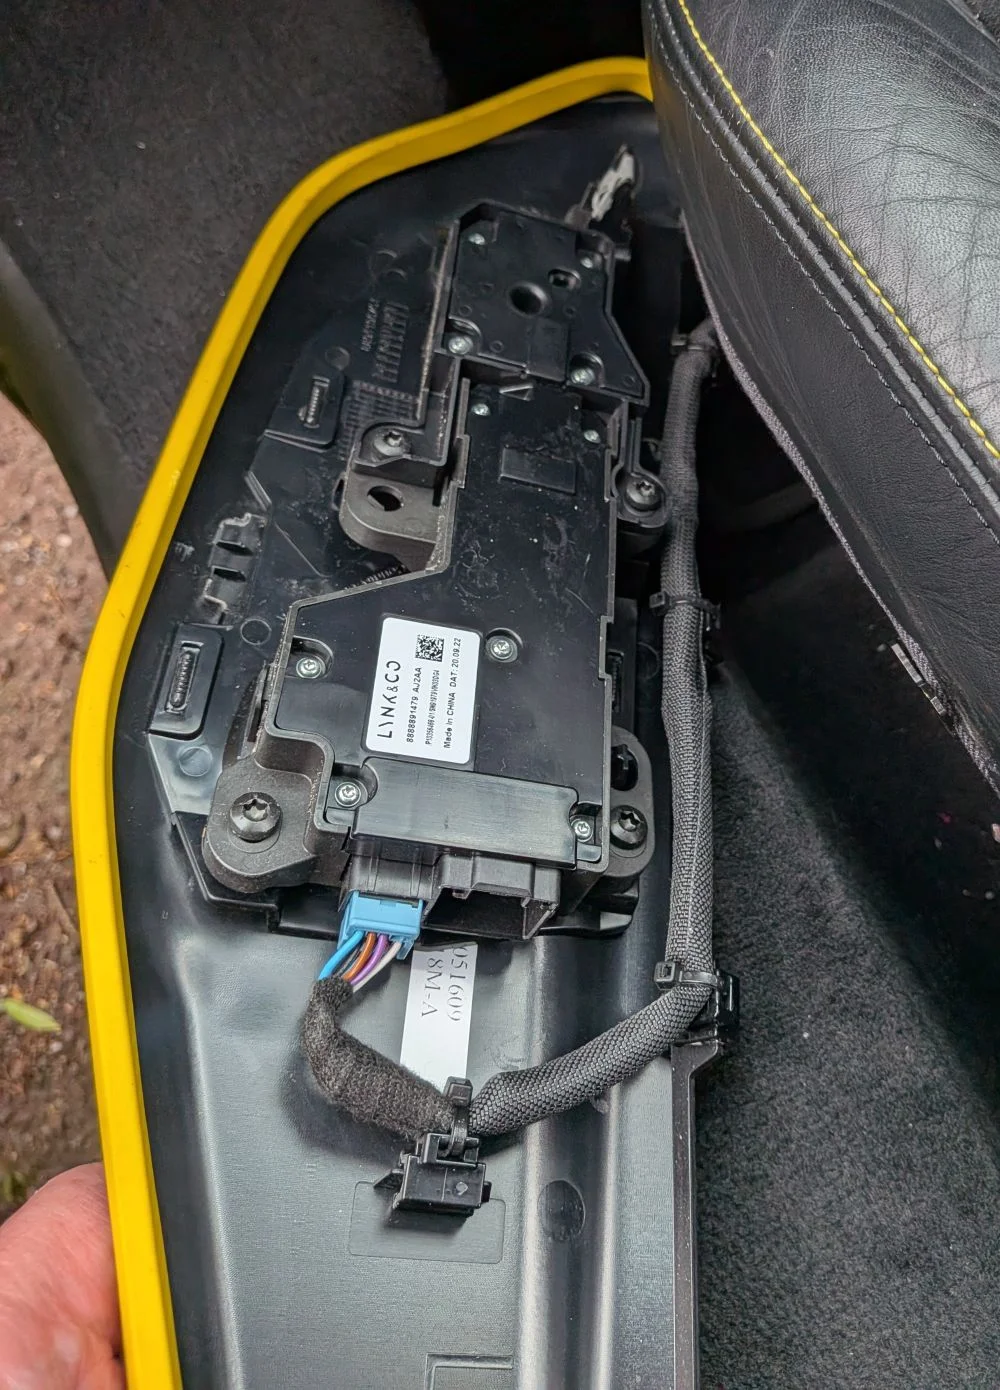
Photo 3 – Seat side panel coming loose
You should now be able to pull the panel away from the side of the seat far enough to work on it.
There are four small zip ties securing the wiring to the seat controls. Cut these with the side cutters, taking care not to damage the wiring.
Then disconnect the blue seat-controls connector.
The panel should now come completely free.
There is no need to remove the seat controls from the panel. Leave them attached — removing and refitting them is a pain.
Step 2 – Repair the broken latch
Start by using some rough sandpaper to remove the remains of the broken plastic latch. Sand it down until the surface is reasonably flush with the surrounding panel.
Also sand the surrounding area. This gives the epoxy a good key and helps it bond securely to the panel.
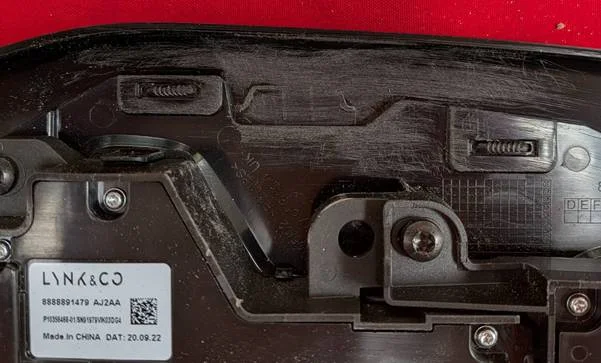
Photo 4 – Broken latch sanded flush. The broken latch has been sanded down. It doesn't look completely flat in the photo, but it is. The surrounding area has also been sanded to provide a good surface for the epoxy.
Clean away all the plastic dust and any grease or dirt. You can use brake cleaner, contact cleaner or simply soap and water — the important thing is that you end up with a clean surface for the epoxy to bond to.
Making the replacement latch
Now cut a section approximately 60 mm long from the heavy-duty zip tie.
Using the pliers, bend this section into roughly the shape shown below.
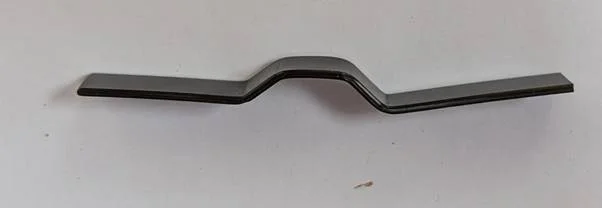
Photo 5 – Bending the replacement latch
You may need to spend a bit of time on this, and possibly make a couple of attempts before you get something that looks about right. It will keep bending back straight – just bend it again.
It doesn't have to be exact. The important dimensions are that the raised central section is approximately 10 mm wide and stands about 8 mm proud of the panel.
This raised section will effectively replace the original plastic latch.
Important: Sand the ends of the zip-tie section as well. This gives the epoxy something to grip onto.
Bonding it into place
Mix your epoxy according to the manufacturer's instructions.
Apply plenty of epoxy to the ends of the replacement latch and position it over the area where the original latch used to be.
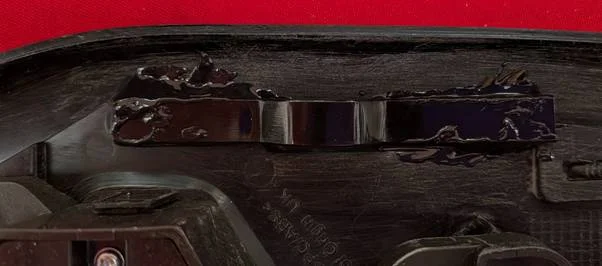
Photo 6 – Replacement nylon latch epoxied into position
The new nylon latch is now bonded into place, with the raised central section covering the location of the original broken latch.
Don't be stingy with the epoxy. This is hidden behind the seat panel, so aesthetics aren't important. The more substantial the bond, the better.
Make sure the raised section is positioned correctly so that it will engage with the metal catch on the seat when the panel is refitted.
Then leave it to cure fully and allow the bond to become stable. Follow the curing time specified by your particular epoxy.
After the epoxy is cured, remove the old cut zip-ties that held the cable from the bottom of the panel and replace them with the four new small zip ties.
If you have protective edging/beading fitted to the top of the panel, remove it now. You won't be able to refit the panel with the beading in place.
Finally, inspect the metal panel clips. These often get bent or mangled when the panel is removed.
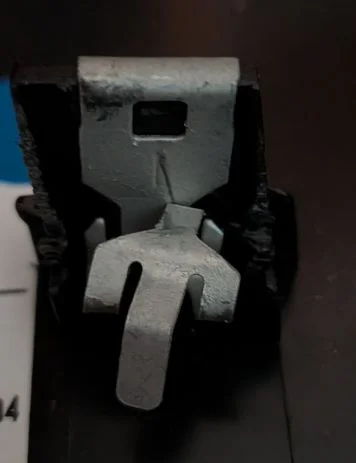
Photo 7 – Bent/mangled panel clip
If necessary, use the pliers to bend them back into shape.
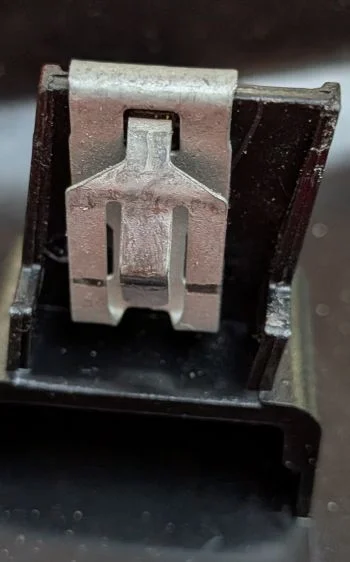
Photo 8 – Panel clip straightened and ready to reuse
The panel should now be ready to go back onto the car.
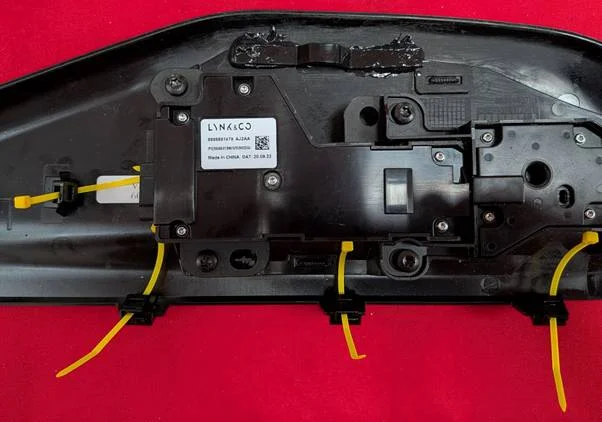
Photo 9 – Repaired panel ready for refitting
Step 3 – Refitting the panel
Advanced warning: refitting the panel can get frustrating!
Start by reconnecting the blue seat-controls connector.
Then secure the wiring back to the seat controls using the new zip ties. There should be visible marks on the wiring bundle wrap showing roughly where the original zip ties were positioned, so use these as a guide and secure the cables in approximately the same places.
Next, engage the rear panel latch over the metal catch near the seat back.
Now comes the fiddly and potentially frustrating bit.
You need to get the repaired replacement latch to engage with the metal catch in the middle of the seat.
If you have made the replacement latch correctly, it should be a reasonably tight fit. This is intentional — you want it to hold the panel firmly against the side of the seat rather than allowing it to move around.
At first, it may feel as though the panel simply isn't going to go back on.
Persevere — it will go.
One useful trick is to press your fingers into the side of the seat and feel down inside the panel while you are fitting it. This allows you to guide the new latch onto the metal catch rather than trying to do it entirely by feel from outside.
Once the middle latch is engaged, make sure the panel is seated fully down on the two pegs and then press the bottom of the panel back into place to engage the three metal push clips.
Finally, if you removed the seat-edge beading, you can refit it now.
That's it.
Hopefully the replacement nylon latch will have enough strength to survive the flexing that eventually destroys the original plastic one, while retaining enough flexibility to cope with the movement of the seat.
I'll update this if it fails again — although having already replaced three panels, I'm hoping this way of fixing it lasts considerably longer!
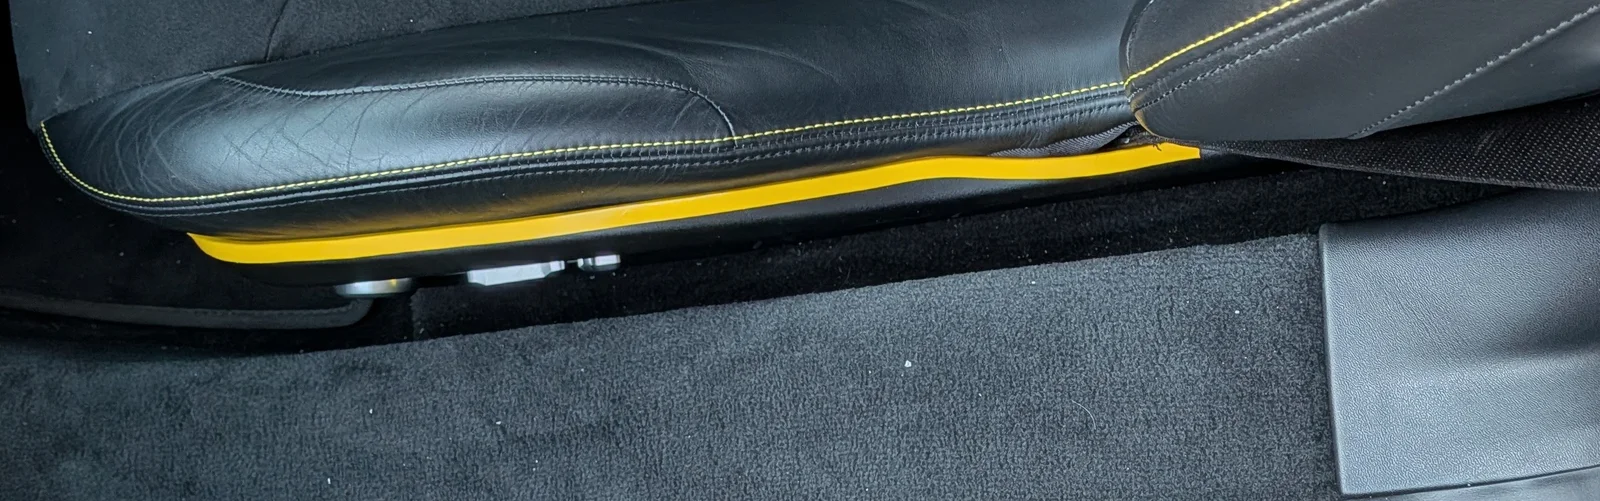
Photo 10 – The repaired panel back in place
The side panels on the Emira seats have a thin plastic latch in the upper middle of the panel. Unfortunately, this latch is under quite a lot of pressure whenever the seat is occupied and is constantly being flexed as you move around in the seat and get in and out of the car.
In my opinion, it’s simply not a particularly good design. The thermosetting plastic is quite thin for the job and the latch is secured against a metal peg. Sooner or later, with normal use, the plastic is likely to fatigue and break.
If you have fitted something such as a rubber bead to the top of the seat panel to protect the leather, this puts even more pressure on the latch. The fact that the sharp edge of the plastic panel does also wear the leather is another aspect of the design that could have been better.
You can get the panel replaced under warranty if the car is under three years old, provided you haven’t fitted something such as a protective bead. However, you may have to wait several months for the replacement part.
Alternatively, you can pay for the replacement yourself. In my case, the part and fitting cost £75, but again, you still have to wait for the part.
The problem with either approach is that the replacement panel uses exactly the same design, so sooner or later it is likely to break in exactly the same place again.
Having already gone through three panels, I decided to try repairing the existing panel with something stronger, but with enough flexibility to hopefully withstand the movement and last considerably longer.
What you will need
Parts
- Plastic panel-bonding epoxy or similar. I used JB Weld Plastic Bonder.
- One heavy-duty zip tie — something strong but still reasonably flexible. I used an 8 mm wide nylon zip tie.
- Four small zip ties.
- Side cutters
- Small pliers
- Rough sandpaper
Photo 1 – My broken passenger seat panel. The gap gets wider when someone sits in the seat.
Before starting, it’s worth having a look at how the panel is constructed and how it attaches to the seat.
Photo 2 – Seat side panel layout
The 2 green arrows show the two plastic latches.
It is the more central latch, located roughly in the middle of the seat base, that has broken on mine. The other latch, towards the seat back, hasn't broken. It isn't subjected to anything like as much pressure or flexing, although I suppose it could eventually suffer the same fate.
The 3 orange arrows show the metal panel push clips which secure the bottom of the panel. These quite often get mangled when the panel is removed.
The 5 pink arrows show the mounting points for the seat controls.
You do not need to remove the seat controls for this repair. In fact, I would strongly recommend leaving them in place, as they are quite fiddly to remove and refit.
Step 1 – Remove the seat panel
First, remove the side panel from the seat.
Start by pulling the bottom of the panel outwards to release the three panel push clips.
Then pull upwards on the rear of the panel, close to the seat back, to release the remaining latch. You might need to wiggle the panel a bit to get it free.
Photo 3 – Seat side panel coming loose
You should now be able to pull the panel away from the side of the seat far enough to work on it.
There are four small zip ties securing the wiring to the seat controls. Cut these with the side cutters, taking care not to damage the wiring.
Then disconnect the blue seat-controls connector.
The panel should now come completely free.
There is no need to remove the seat controls from the panel. Leave them attached — removing and refitting them is a pain.
Step 2 – Repair the broken latch
Start by using some rough sandpaper to remove the remains of the broken plastic latch. Sand it down until the surface is reasonably flush with the surrounding panel.
Also sand the surrounding area. This gives the epoxy a good key and helps it bond securely to the panel.
Photo 4 – Broken latch sanded flush. The broken latch has been sanded down. It doesn't look completely flat in the photo, but it is. The surrounding area has also been sanded to provide a good surface for the epoxy.
Clean away all the plastic dust and any grease or dirt. You can use brake cleaner, contact cleaner or simply soap and water — the important thing is that you end up with a clean surface for the epoxy to bond to.
Making the replacement latch
Now cut a section approximately 60 mm long from the heavy-duty zip tie.
Using the pliers, bend this section into roughly the shape shown below.
Photo 5 – Bending the replacement latch
You may need to spend a bit of time on this, and possibly make a couple of attempts before you get something that looks about right. It will keep bending back straight – just bend it again.
It doesn't have to be exact. The important dimensions are that the raised central section is approximately 10 mm wide and stands about 8 mm proud of the panel.
This raised section will effectively replace the original plastic latch.
Important: Sand the ends of the zip-tie section as well. This gives the epoxy something to grip onto.
Bonding it into place
Mix your epoxy according to the manufacturer's instructions.
Apply plenty of epoxy to the ends of the replacement latch and position it over the area where the original latch used to be.
Photo 6 – Replacement nylon latch epoxied into position
The new nylon latch is now bonded into place, with the raised central section covering the location of the original broken latch.
Don't be stingy with the epoxy. This is hidden behind the seat panel, so aesthetics aren't important. The more substantial the bond, the better.
Make sure the raised section is positioned correctly so that it will engage with the metal catch on the seat when the panel is refitted.
Then leave it to cure fully and allow the bond to become stable. Follow the curing time specified by your particular epoxy.
After the epoxy is cured, remove the old cut zip-ties that held the cable from the bottom of the panel and replace them with the four new small zip ties.
If you have protective edging/beading fitted to the top of the panel, remove it now. You won't be able to refit the panel with the beading in place.
Finally, inspect the metal panel clips. These often get bent or mangled when the panel is removed.
Photo 7 – Bent/mangled panel clip
If necessary, use the pliers to bend them back into shape.
Photo 8 – Panel clip straightened and ready to reuse
The panel should now be ready to go back onto the car.
Photo 9 – Repaired panel ready for refitting
Step 3 – Refitting the panel
Advanced warning: refitting the panel can get frustrating!
Start by reconnecting the blue seat-controls connector.
Then secure the wiring back to the seat controls using the new zip ties. There should be visible marks on the wiring bundle wrap showing roughly where the original zip ties were positioned, so use these as a guide and secure the cables in approximately the same places.
Next, engage the rear panel latch over the metal catch near the seat back.
Now comes the fiddly and potentially frustrating bit.
You need to get the repaired replacement latch to engage with the metal catch in the middle of the seat.
If you have made the replacement latch correctly, it should be a reasonably tight fit. This is intentional — you want it to hold the panel firmly against the side of the seat rather than allowing it to move around.
At first, it may feel as though the panel simply isn't going to go back on.
Persevere — it will go.
One useful trick is to press your fingers into the side of the seat and feel down inside the panel while you are fitting it. This allows you to guide the new latch onto the metal catch rather than trying to do it entirely by feel from outside.
Once the middle latch is engaged, make sure the panel is seated fully down on the two pegs and then press the bottom of the panel back into place to engage the three metal push clips.
Finally, if you removed the seat-edge beading, you can refit it now.
That's it.
Hopefully the replacement nylon latch will have enough strength to survive the flexing that eventually destroys the original plastic one, while retaining enough flexibility to cope with the movement of the seat.
I'll update this if it fails again — although having already replaced three panels, I'm hoping this way of fixing it lasts considerably longer!
Photo 10 – The repaired panel back in place
Last edited: