Adam Brouillard
Emira Fan
Just notice I can pull the interior trim around the rear window out a few inches at the top on both sides. Photo shows the area I am takling about. Just wondering if that is normal.

Follow along with the video below to see how to install our site as a web app on your home screen.
Note: This feature may not be available in some browsers.
Hi Adam,Just notice I can pull the interior trim around the rear window out a few inches at the top on both sides. Photo shows the area I am takling about. Just wondering if that is normal.
View attachment 59269
I've had another look at the rear window trim surround. The base, running under the window, is securely held in place and sits away from the glass itself. Just enough to get finger tips between glass and trim. The sides of the trim, I believe, are also designed to sit away from the glass but this is where I suspect I have squeaks.Hi Adam,
I have exactly the same on my Emira. I've tried pulling away to see how it's (supposed to be) connected but it's stuck firmly at the bottom Centre.
Did you resolve your loose trim and, if so, how? Thanks.
This is the issue. It's hard to reseat those clips in that area. Instead of wood, maybe try a small block of hard foam type material. Let us know what worked for you.I've had another look at the rear window trim surround. The base, running under the window, is securely held in place and sits away from the glass itself. Just enough to get finger tips between glass and trim. The sides of the trim, I believe, are also designed to sit away from the glass but this is where I suspect I have squeaks.
The trim is held in place by thin metal wedge shaped 'springs' over a plastic base. These wedge shaped lugs sit in horizontal slots cut into the end of the side panel trim. Unfortunately, the end of the side panel trim floats, which means that when pressure is applied to the top side rear trim the retaining slot just flexes away. I tried holding the receiving side trim slot in place by sliding my fingers behind it as I tried pushing the wedge shaped lug into place with my other hand. I could not apply enough pressure.
I've run out of time this morning, but I might try sliding a wooden batten or similar, to stop the flexing, behind the side trim while aggressively pushing the rear trim lugs home.
Hi Adam,Just notice I can pull the interior trim around the rear window out a few inches at the top on both sides. Photo shows the area I am takling about. Just wondering if that is normal.
View attachment 59269


Very helpful, thanks Crestima.Hi Adam,
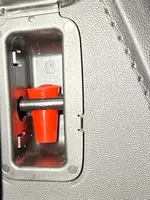
When I removed the rear shelf trim piece for my soundproofing project, I also noticed that wide gap and loose fit in the window/trim area, particularly in the top corner section of the plastic trim piece. I ensured that all the trim pice clips had been properly aligned and locked back in place, so I concluded that this was simply the way this trim piece had been designed. In may case, correcting this was not due to any detected rattling, rather it was because the trims' wide uneven gap and its looseness in the upper corners just bothered me. I simply wedged a cylindrical silicone piece inside the anchor housings between the metal latch and the plastic trim. This helped to press the upper trim piece closer to the rear window. To this date, I have yet to use those latches and I doubt I will ever need to, although the wedges can easily be removed by hand, if ever needed anyway. Below is a picture of the wedge I placed in the latches and another of the Amazon product I used. Hope you find this somewhat helpful.
View attachment 63943View attachment 63944
Hi Blat,Very helpful, thanks Crestima.
When I pulled at the rear trim, I could only expose what was behind the top left and top right of the trim. The lower section running below the window, above the luggage shelf area, stuck fast. I assume those latches are under there. How did you release them? Brute force or is there a technique?
Thanks!
Very helpful, thanks Crestima. I'll give this a goHi Blat,
I'm not sure if you've already done this, but you need to. First, remove the 2 small side panels in the back shelf area where the subwoofer is on one side and the boot release cable is on the other (they are only secured by clips). Then, remove the large vertical carpeted panel which is secured by 3 small bolts on each end. Finally, remove the 6mm bolt in the upper middle section of that large plastic trim that surrounds the back window. this is the only bolt in the entire panel as all the other fittings are plastic tabs/clips. Hope this works out for you.